
Looking to transform your table top? You’ve got plenty of exciting options! From rustic reclaimed barn wood that tells a story, to stunning penny mosaics that sparkle, there’s a DIY project perfect for you. Try creating an epoxy river design with beautiful blue swirls, or showcase your wine cork collection under glass. Natural live-edge slabs bring organic charm, while geometric wood inlays add modern flair. Mix concrete with wood for an industrial vibe, or arrange colorful tiles in a mosaic pattern. Whether you’re crafty or just starting out, these creative ideas will help you design a table that’s uniquely yours.
Reclaimed Barn Wood Table Top
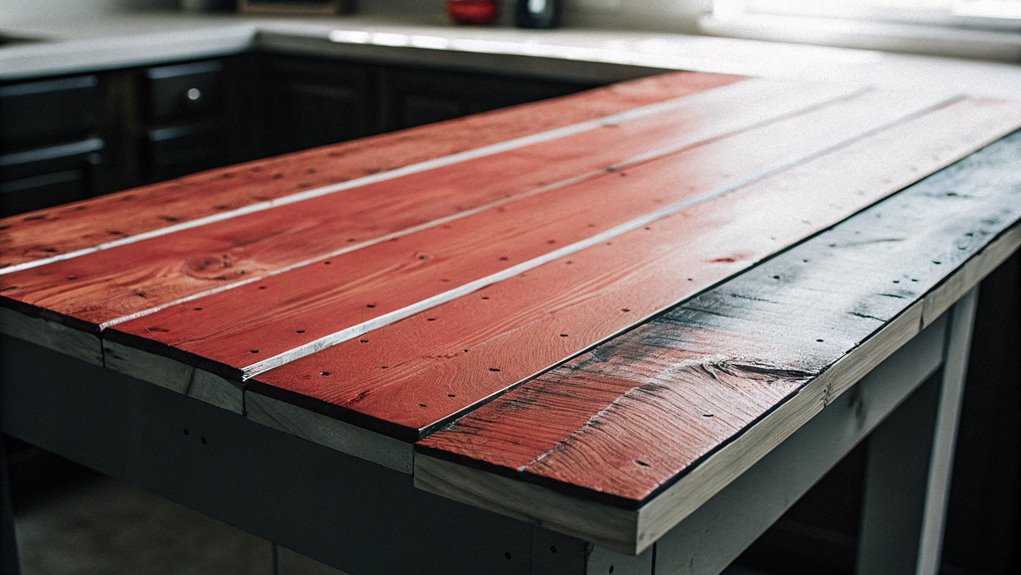
Crafting a table top from reclaimed barn wood combines rustic charm with environmental consciousness. You’ll love how each plank tells a story through its weathered grain and unique reclaimed finishes. To achieve authentic rustic aesthetics, carefully sand the wood while preserving its character marks and natural imperfections. Your finished piece will become a conversation starter that brings farmhouse warmth to any room.
Penny-Covered Design
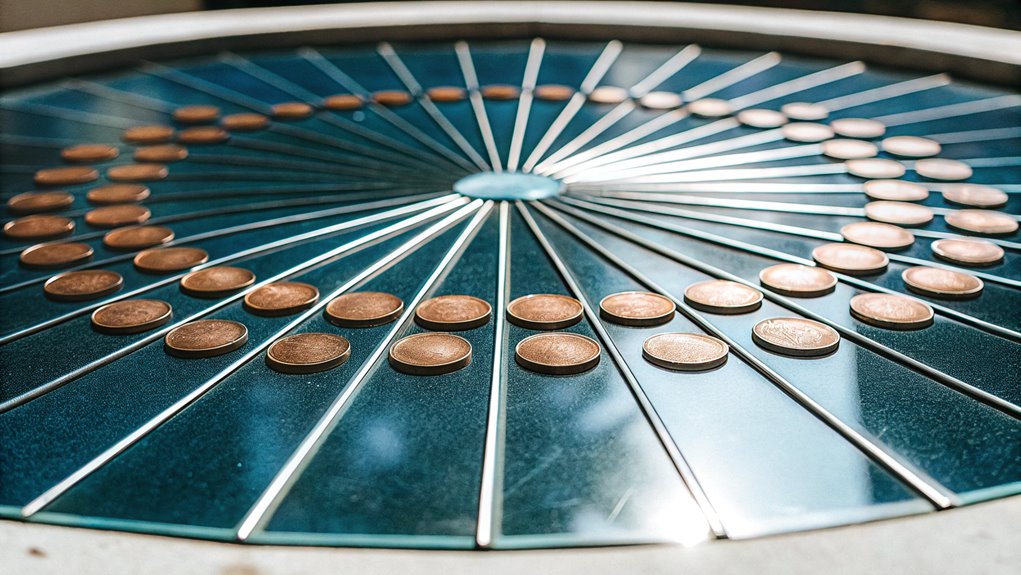
A penny-covered table top offers a striking metallic alternative to traditional wood surfaces. You can create stunning penny art by arranging coins in unique patterns, showcasing both their copper shine and penny history dating back to the 1700s. Simply arrange your pennies on the table surface, secure them with epoxy, and watch as your one-of-a-kind conversation piece comes to life.
Concrete and Wood Fusion
Blending concrete and wood creates a striking balance between industrial and natural elements in table design. You can experiment with various concrete finishes, from smooth to textured, while complementing them with rich wood stains. Pour concrete into wooden frames, leaving sections exposed to showcase the natural wood grain. This combination offers durability and warmth, making your table both functional and visually appealing.
Wine Cork Display
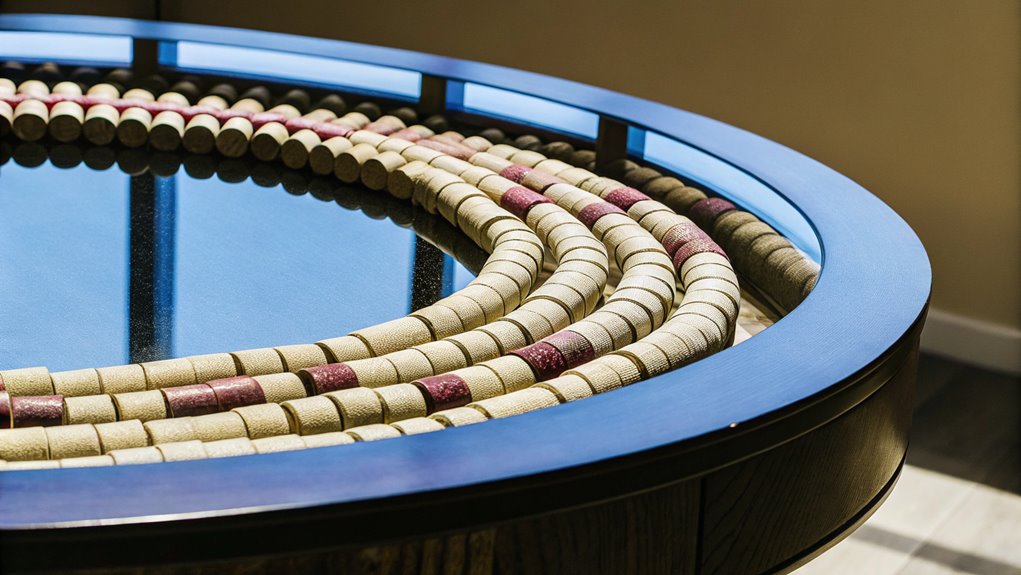
Transform your favorite wine memories into a unique tabletop by incorporating collected wine corks into a clear epoxy design. Similar to cork wall art, this project creates a stunning visual display that tells your wine-tasting story. You can arrange the corks in patterns or randomly, just like creating oversized wine cork coasters. The result is a conversational piece that preserves cherished moments.
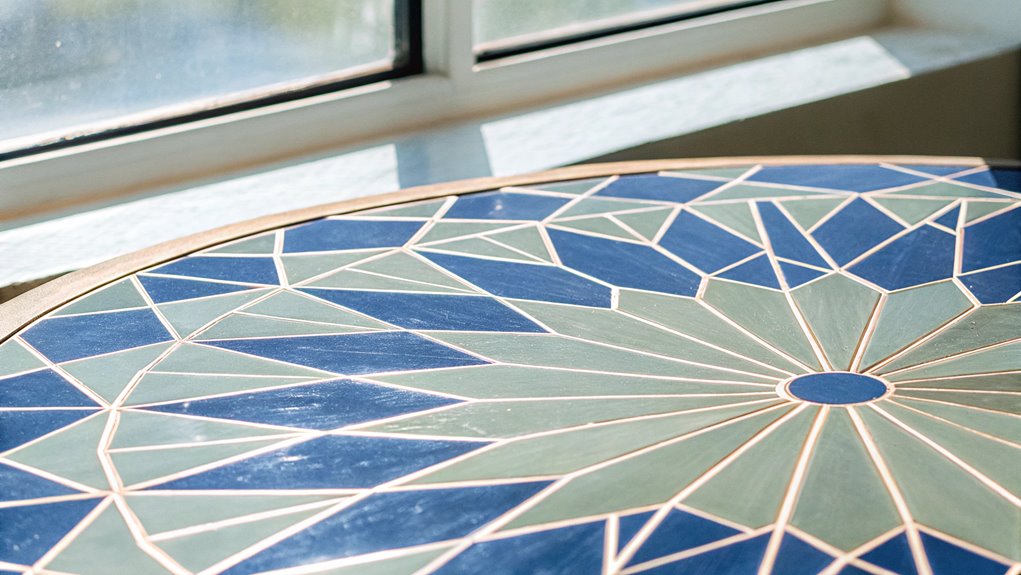
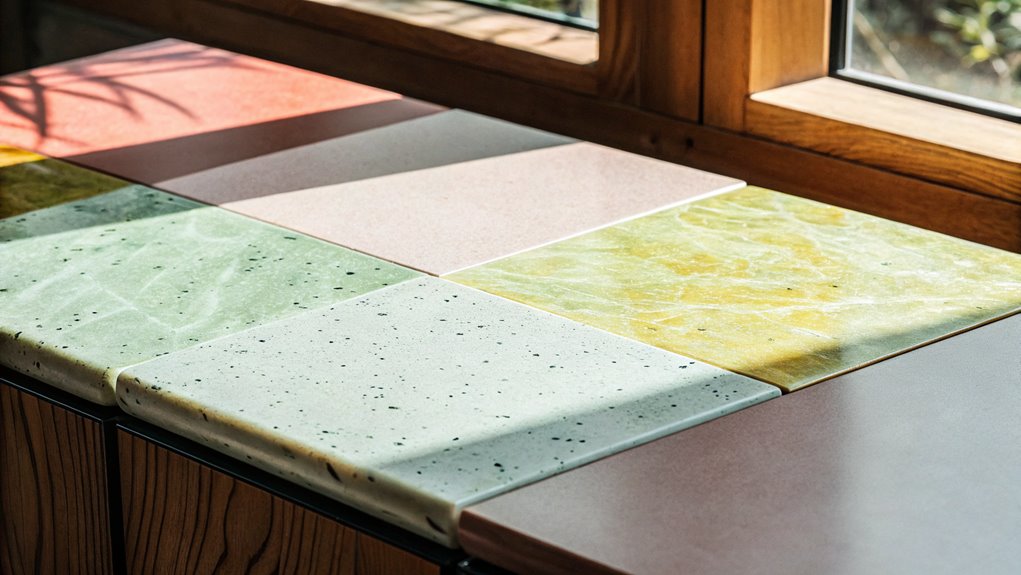
Mosaic Tile Pattern

Creating intricate mosaic tile patterns offers another striking approach to personalizing your table surface. You can explore various mosaic techniques using different tile materials like glass, ceramic, or stone pieces. Whether you choose a geometric design or a free-flowing pattern, arranging colorful tiles creates a unique focal point. With proper grouting and sealing, your mosaic tabletop will become a durable conversation piece.
Epoxy River Flow
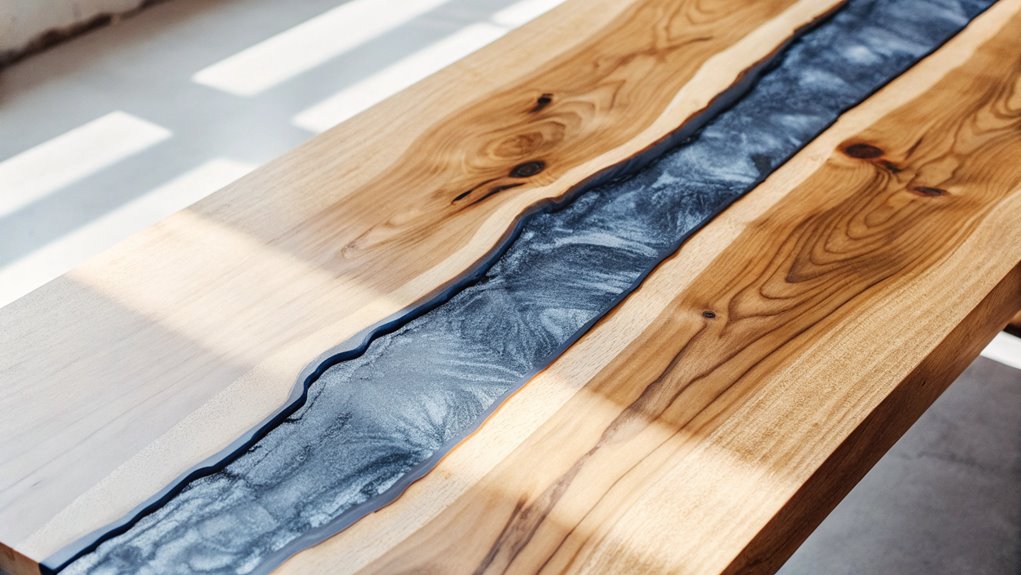
The epoxy river flow technique has emerged as a stunning way to incorporate fluid, nature-inspired designs into table surfaces. You can create mesmerizing patterns by mastering basic epoxy techniques and experimenting with color blending. Choose your favorite colors, pour them strategically, and watch as they flow together, creating unique riverlike patterns that transform your ordinary table into a conversation-starting piece of art.
Bottle Cap Collection
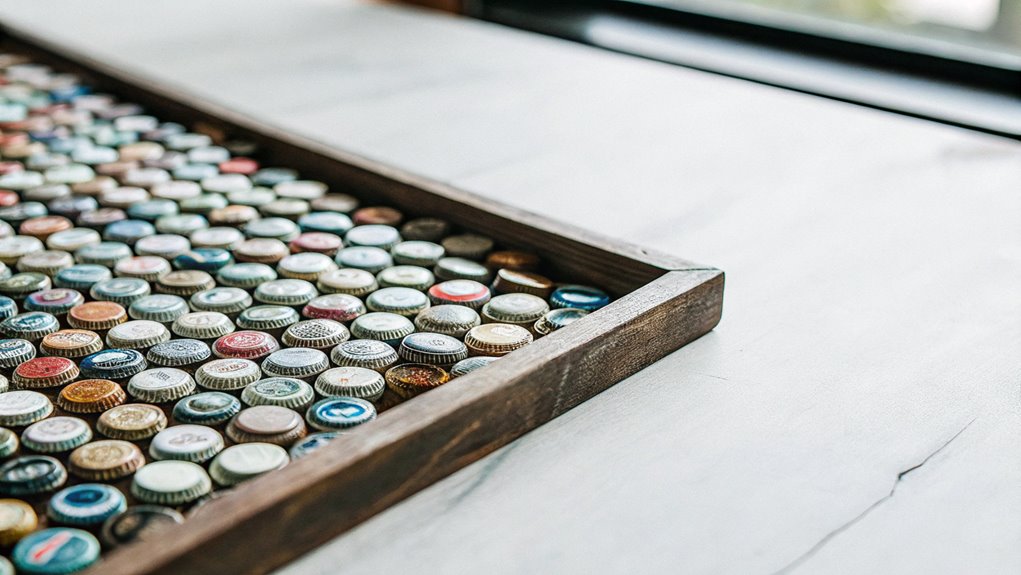
From fluid designs to collected memories, bottle cap collections offer another creative approach for personalizing table tops. You can create stunning bottle cap art by arranging your favorite vintage bottle caps in patterns or mosaics. Whether you’ve collected caps from special occasions or inherited a treasure trove of retro designs, this project lets you showcase your unique collection while creating a functional conversation piece.
Pallet Wood Arrangement
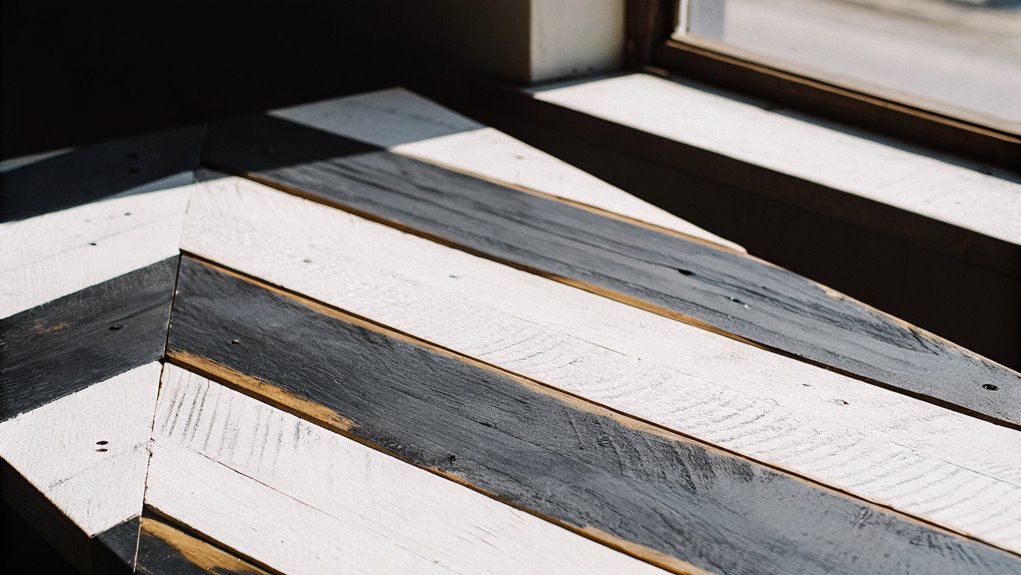
Repurposed pallet wood presents an eco-friendly and rustic solution for crafting distinctive table tops. When you’re diving into pallet wood crafting, start by selecting boards with minimal damage and interesting grain patterns. Sand them thoroughly, then arrange them in eye-catching patterns like herringbone or chevron. Finally, protect your creation with pallet wood finishes like polyurethane to seal and enhance the natural beauty.
Geometric Wood Inlay
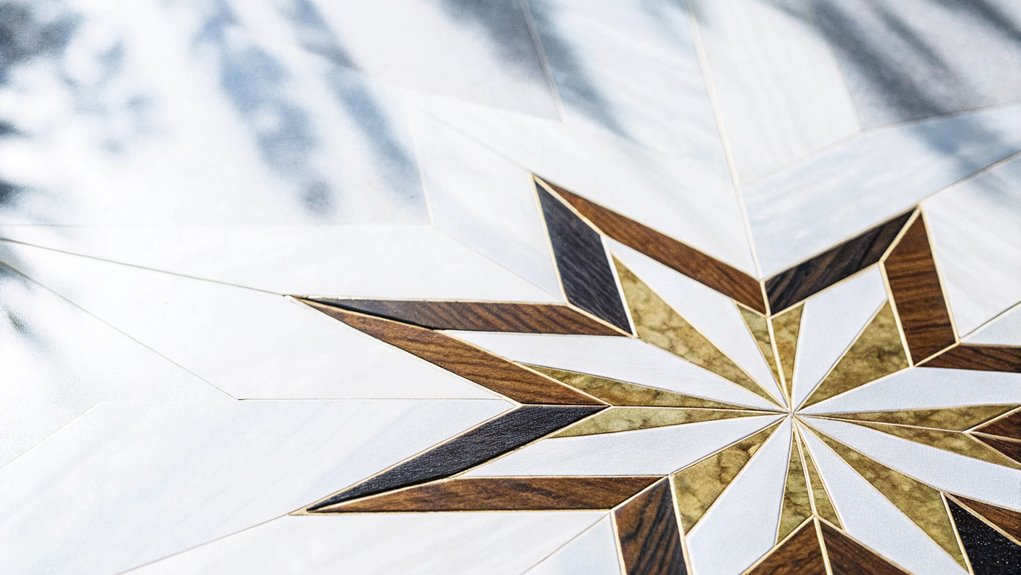
Creating stunning geometric wood inlay patterns can transform an ordinary table top into a masterpiece of visual intrigue. You can mix different wood finishes to create eye-catching designs like stars, diamonds, or intricate tessellations. Start by sketching your geometric patterns on paper, then carefully cut and arrange wood pieces like a puzzle. The contrast between light and dark woods makes the design pop.
Stained Glass Masterpiece
A stained glass tabletop brings the luminous beauty of cathedral windows to your furniture design. You can create stunning patterns using basic stained glass techniques, connecting colorful pieces with copper foil and solder. Choose color combinations that complement your room’s decor – from bold jewel tones to subtle pastels. When light hits your table, it’ll cast beautiful colored shadows, making your space truly magical.
Industrial Pipe Accent
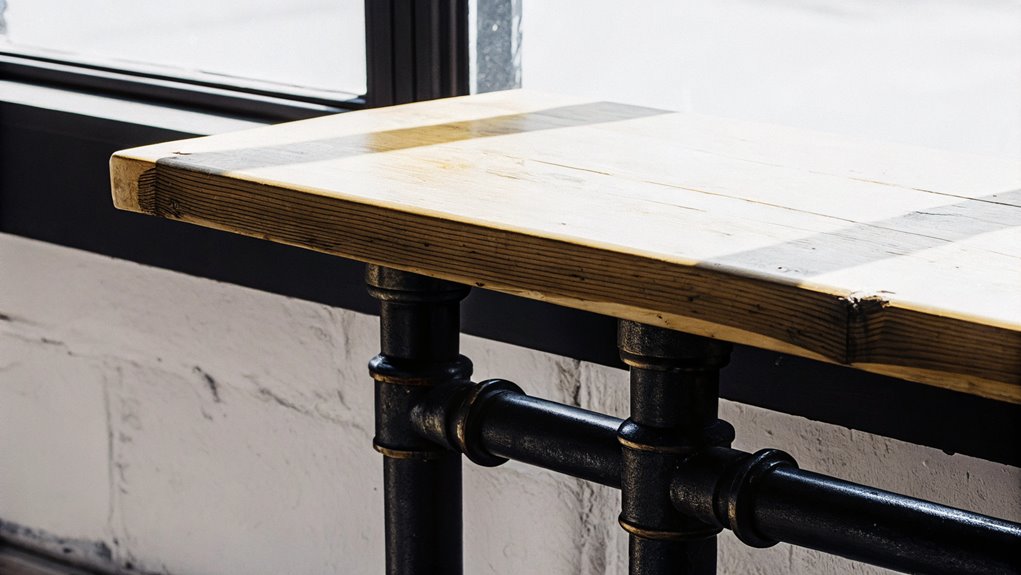
Through clever integration of industrial pipe fixtures, your tabletop can embody the raw appeal of urban design. By arranging black or bronze pipe fittings as table legs or decorative borders, you’ll create a striking blend of industrial aesthetics and functionality. Consider mixing different pipe sizes and connections to add visual interest, or incorporate threaded flanges for a bold industrial statement that’s uniquely yours.
Painted Mandala Art
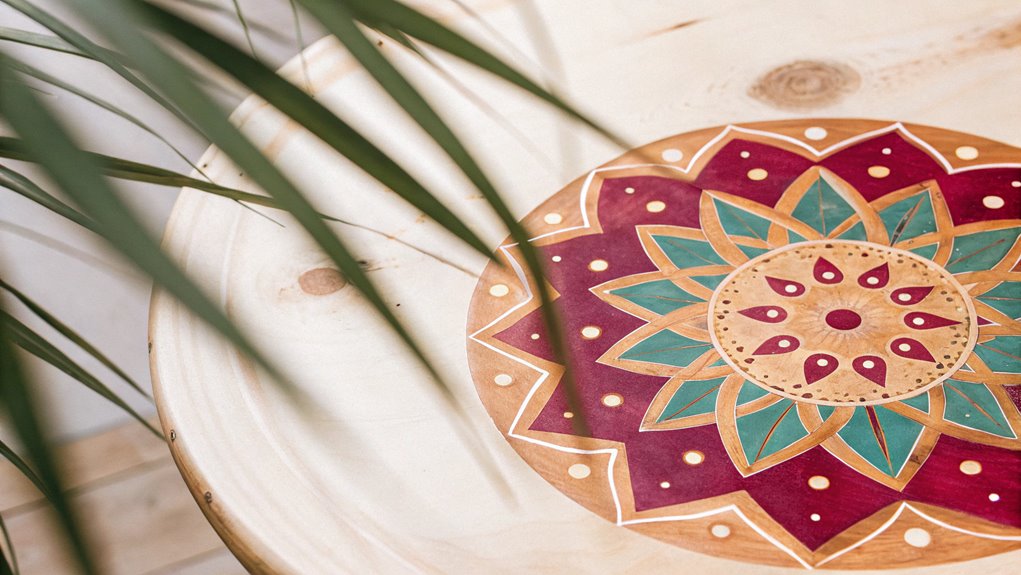
While industrial designs emphasize structural elements, painted mandala art offers a meditative and intricate approach to table customization. You’ll find that mandala painting techniques start from the center, gradually expanding outward in symmetrical patterns. When selecting your color palette, choose 3-4 complementary shades that match your room’s decor. Start with light colors and layer darker ones to create depth.
License Plate Collage

License plate collections transform ordinary tabletops into striking conversation pieces that celebrate road-trip memories and vintage Americana. You can create unique artistic arrangements by laying out vintage license plates in a puzzle-like pattern, sealing them with clear epoxy. Mix states, colors, and decades to add visual interest. Just make sure to clean and sand each plate before securing them to your tabletop.
Rustic Door Repurpose
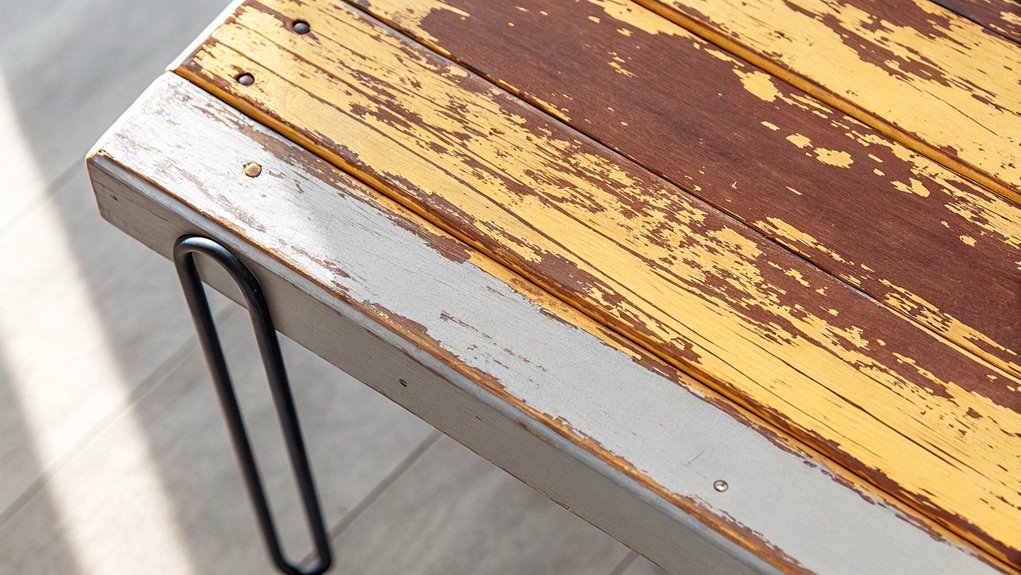
Charm and character shine through when repurposing an old wooden door into a distinctive tabletop. Remove existing door hardware and sand the surface smooth while preserving some of its natural wear marks. You can enhance its rustic finishes by distressing specific areas or applying a weathered stain. Once sealed properly, your vintage door becomes a conversation-starting table that tells its own story.
Colored Cement Blocks
Creating unique table surfaces with colored cement blocks offers an industrial-chic aesthetic that’s both durable and customizable. You can experiment with colored cement finishes by mixing different pigments into your concrete mixture. The fun part is playing with color mixing techniques – try swirling patterns or creating ombre effects. With proper sealing, your colorful cement tabletop will last for years while making a bold statement.
Pressed Flower Display
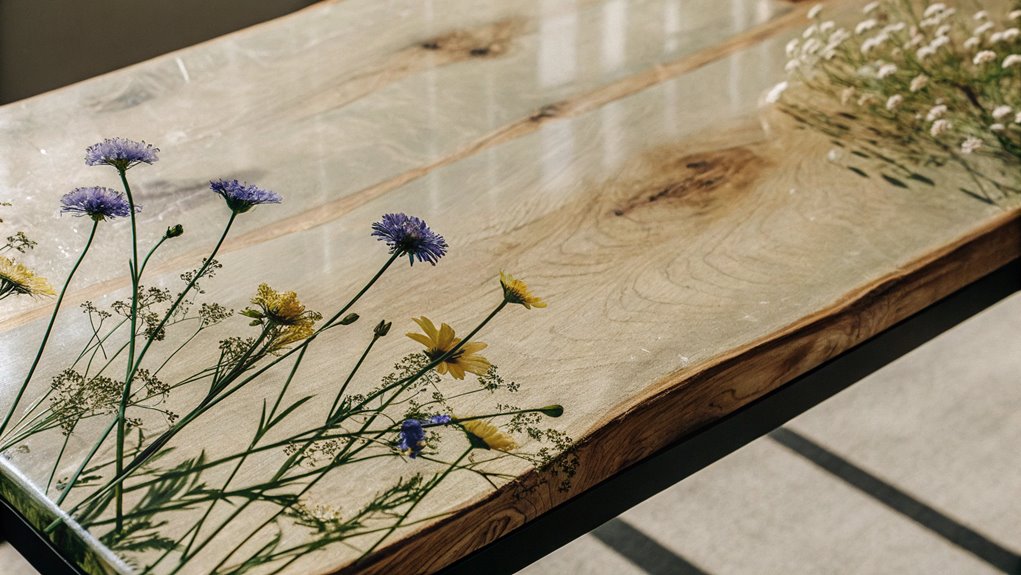
With a touch of natural elegance, pressed flower displays transform ordinary tabletops into stunning botanical showcases. Using simple flower preservation techniques, you can create lasting memories of your favorite blooms. Try pressing flowers between heavy books, then explore creative framing options like clear glass tabletops or resin-sealed surfaces. Your unique garden-inspired masterpiece will become a conversation starter while protecting delicate petals beneath.
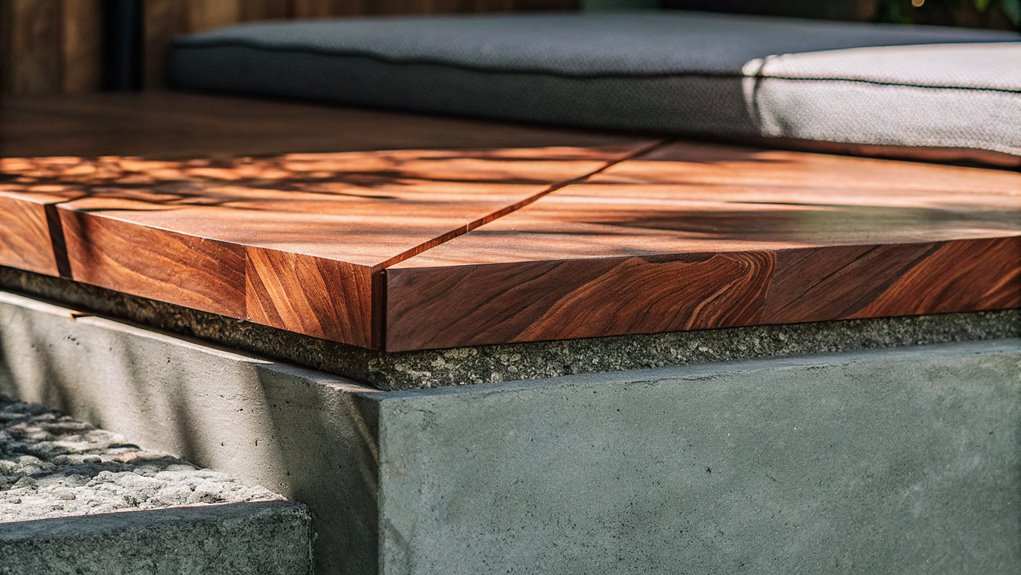
Live Edge Slab

Natural wood’s raw beauty takes center stage with live edge slabs, where the tree’s organic contours remain untouched along the tabletop’s borders. You’ll love how these distinctive pieces showcase live edge aesthetics while bringing organic warmth to your space. With a variety of natural wood finishes available, from matte to glossy, you can seal and protect your slab while highlighting its unique character.
Chess Board Pattern
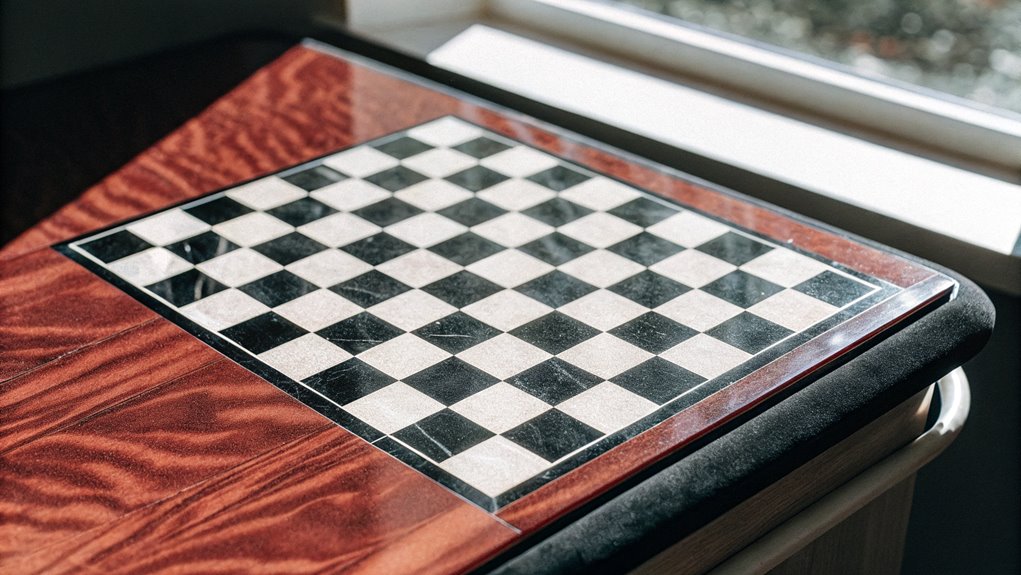
The classic chess board pattern brings timeless elegance to any tabletop design through its distinctive alternating squares of contrasting woods or materials.
You can create this eye-catching pattern to not only showcase your craftsmanship but also provide a functional surface for strategic gameplay. By carefully aligning dark and light squares, you’ll craft a beautiful tabletop that doubles as a conversation piece and chess piece design station.
Copper Penny Mosaic
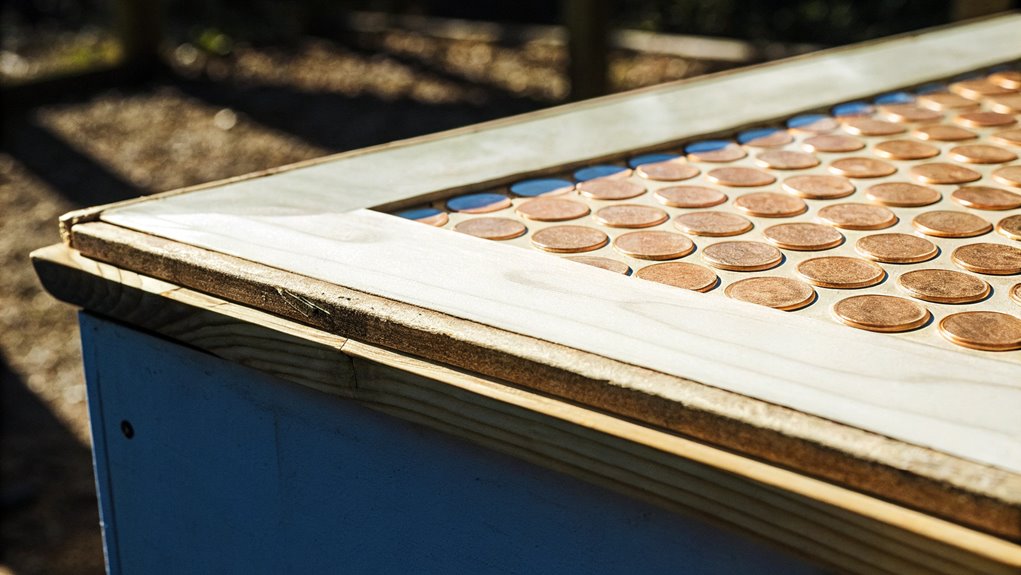
Moving from geometric wood patterns to metallic designs, copper penny mosaics offer a striking way to create an artistic tabletop surface. With proper penny care, including cleaning and sealing each coin, you can arrange them into stunning patterns. Basic mosaic techniques involve securing the pennies with epoxy and filling gaps with grout, creating a conversation-worthy piece that literally sparkles with copper charm.
Burnt Wood Japanese Style
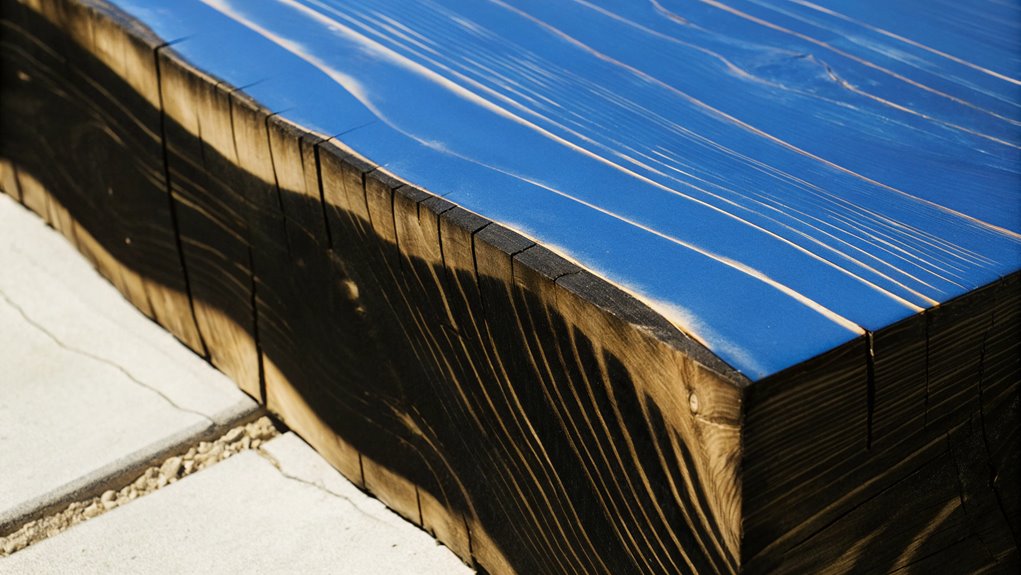
Inspired by traditional Shou Sugi Ban techniques, burnt wood Japanese style tabletops showcase dramatic charred textures while offering remarkable durability. You’ll love how this ancient method creates stunning charred accents through controlled burning, followed by wire brushing and sealing. The traditional craftsmanship brings depth and character to your table, making it a unique conversation piece that’s both beautiful and resilient.
Frequently Asked Questions
How Long Should I Let a Custom Table Top Cure Before Regular Use?
The cure time for your table top depends on the finish types you’ve used. Oil-based finishes typically need 30 days to fully cure, while water-based finishes can be ready in 7-14 days. Polyurethane needs about 24-72 hours before light use, but 30 days for complete curing. While you might be enthusiastic to use your new table, patience guarantees the best long-term durability and protection.
What Tools Are Essential for Someone Starting Their First Table Top Project?
Time to nail down your tool essentials! Start with safety equipment: safety glasses, ear protection, and a dust mask are non-negotiable. For the actual work, you’ll need a circular saw or table saw, drill, measuring tape, pencil, wood clamps, and sandpaper in various grits. Smart wood selection begins with a moisture meter to verify your wood is properly dried. A level and square will help keep everything aligned.
Can Outdoor Table Tops Be Made Using the Same Techniques as Indoor Ones?
While indoor and outdoor table tops share basic construction techniques, outdoor projects require special consideration for weather resistance. You’ll need to use outdoor materials like cedar, teak, or pressure-treated lumber, and apply weather-resistant sealants or marine-grade finishes. Your joints should be extra tight to prevent water damage, and you might want to add drainage gaps between boards. Metal fasteners should be stainless steel or galvanized to prevent rusting.
How Do I Prevent Warping in Wooden Table Tops Over Time?
To prevent wooden table tops from warping, start with proper wood selection, choosing kiln-dried lumber with a moisture content of 6-8%. Store your wood in your workspace for several days before starting, allowing it to acclimate. Use alternating grain patterns when gluing boards together, and apply finish evenly on all sides. Regular moisture control through proper sealing and avoiding extreme temperature changes will keep your tabletop stable.
What’s the Average Cost Difference Between DIY Table Tops and Store-Bought Ones?
Like finding a hidden treasure in your wallet, DIY table tops typically cost 40-60% less than store-bought alternatives. When doing your budget planning, you’ll find that a homemade solid wood tabletop might cost $100-200 in materials, while a comparable store-bought version often runs $300-500. However, remember that your cost comparison should factor in tools you’ll need and your valuable time investment.
