Transforming your bathroom countertop doesn’t require a hefty investment or professional expertise. In fact, creative DIY solutions can deliver stunning results while keeping costs manageable. From simple painted laminate transformations to sophisticated concrete overlays and artistic mosaic designs, homeowners now have access to an impressive array of techniques and materials. Whether you’re seeking an eco-friendly option with recycled materials or aiming to achieve a high-end look with faux marble epoxy, these innovative approaches offer practical solutions for every style preference and skill level. Let’s explore these versatile options that can revolutionize your bathroom’s aesthetic appeal.
Painted Laminate Makeover

With careful preparation and the right materials, transforming an outdated laminate bathroom countertop through paint is a budget-friendly alternative to replacement. You’ll need to thoroughly clean the surface, sand it lightly, and apply a primer designed for laminate. Choose a countertop paint kit or acrylic paint, and finish with several coats of clear sealant for durability and water resistance.
Concrete Overlay Design
Creating a concrete overlay offers another cost-effective way to update a bathroom countertop without complete replacement. You can transform your old surface by applying a thin layer of concrete over existing laminate or tile. The process involves cleaning, priming, and spreading the concrete mix evenly. Once it cures, seal it properly to protect against water damage and stains.
Penny Tile Surface
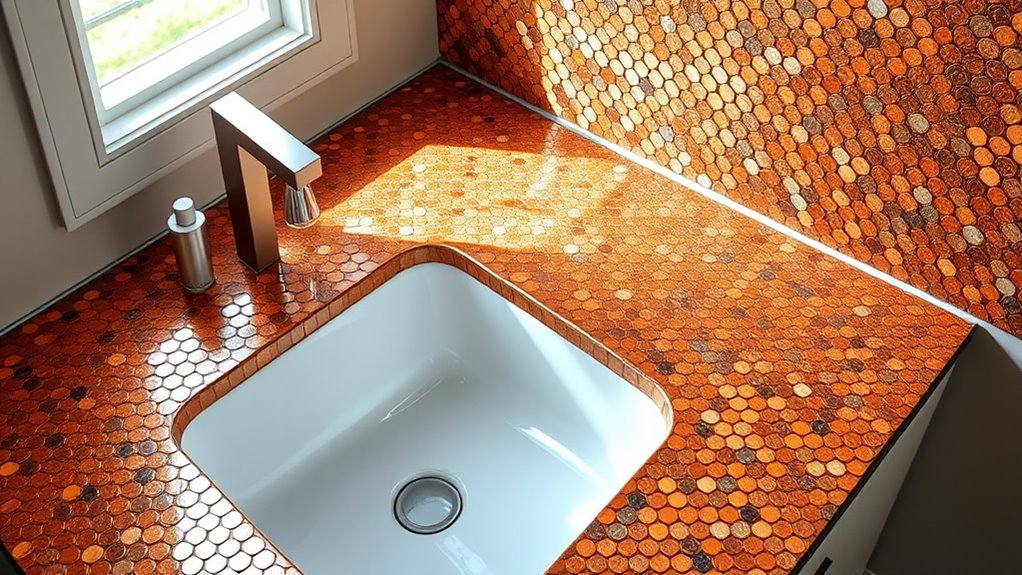
Looking for a unique and eye-catching countertop design? A penny tile surface might be your perfect solution. You can create a stunning mosaic pattern using small, circular tiles that resemble pennies. These tiles come in various colors and finishes, from copper to ceramic, allowing you to customize your design. The surface is durable, water-resistant, and adds vintage charm to your bathroom space.
Recycled Glass Countertop
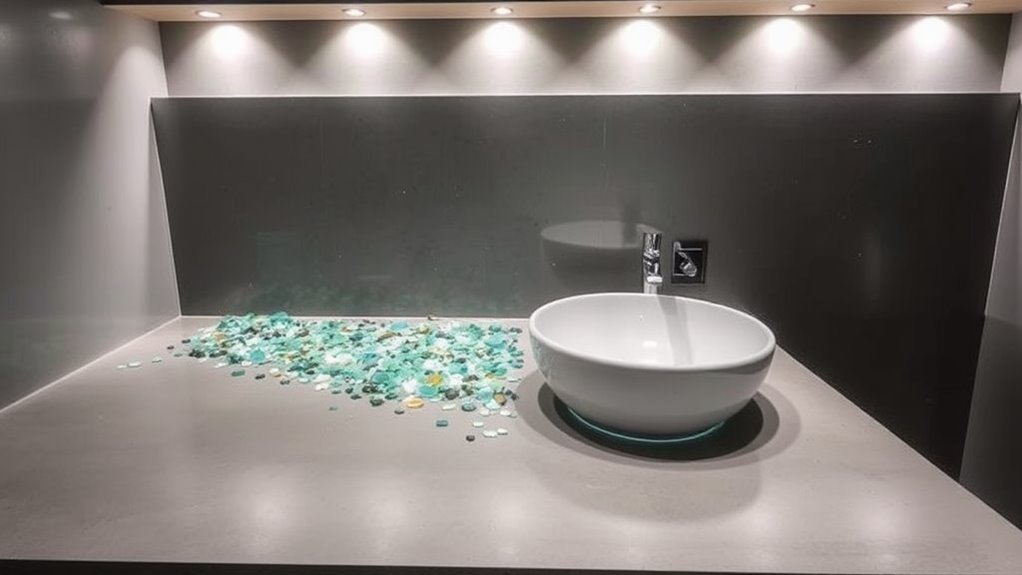
Sustainability meets elegance in a recycled glass countertop, which combines crushed glass fragments with a clear resin or concrete base. You can create stunning effects by choosing colored glass pieces that match your bathroom’s theme. The surface sparkles like jewels when light hits it, and you’ll love knowing your beautiful countertop helps reduce waste by repurposing glass that might otherwise end up in landfills.
Faux Marble Epoxy
Why spend thousands on natural marble when you can achieve a similarly luxurious look with faux marble epoxy? This DIY solution lets you transform your existing countertop into a stunning marble-like surface. Using white epoxy resin as your base, you’ll create realistic veining patterns with metallic pigments and a heat gun. The result is a durable, waterproof surface that’s sure to impress your guests.
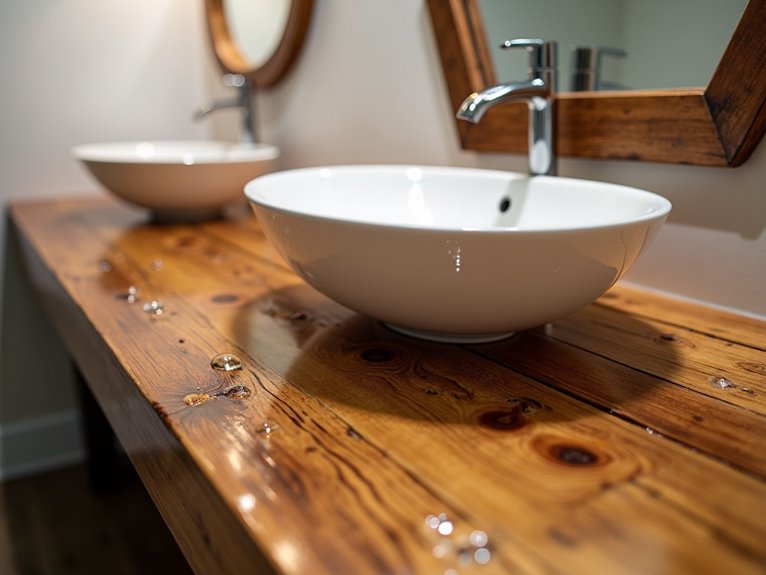
Wood Slice Vanity Top
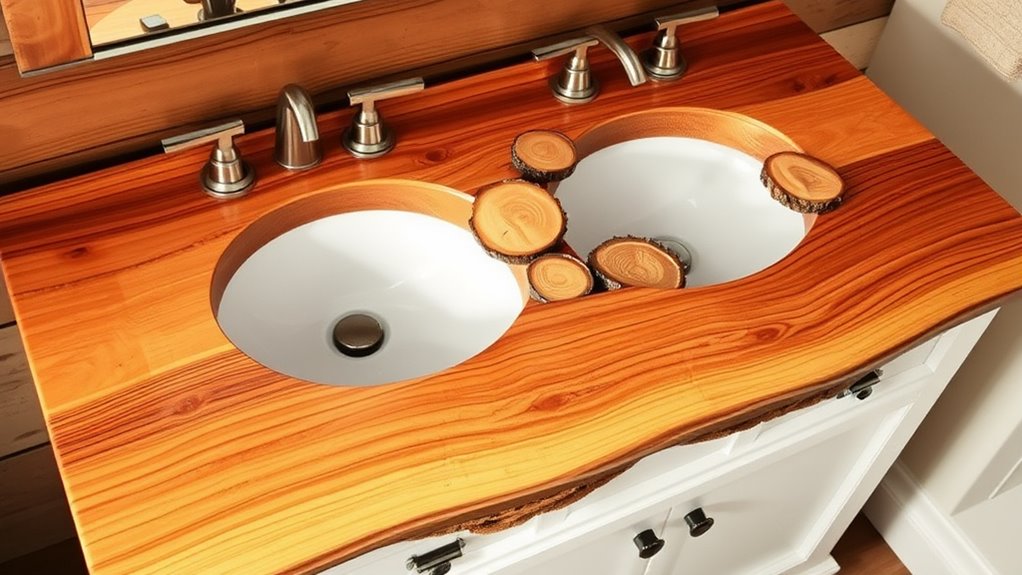
A wood slice vanity top offers a striking blend of rustic charm and natural elegance for your bathroom countertop. You can create this eye-catching surface by selecting a large wood slab, sanding it smooth, and treating it with multiple layers of waterproof sealant. Each piece tells its own story through unique grain patterns and natural edges, making your vanity truly one-of-a-kind.
River Rock Mosaic
River rock mosaics bring the soothing essence of nature indoors, offering another organic approach to bathroom countertop design. You can create this unique look by arranging smooth river rocks in a pattern you love, then securing them with clear epoxy. The rocks’ varying colors and sizes add visual interest, while the sealed surface stays water-resistant and easy to clean.
Stained Concrete Creation
Stained concrete countertops offer an affordable yet sophisticated solution for bathroom renovations. You can easily create one by building a mold, mixing concrete, and adding your chosen stain colors. The best part? You’ll get a unique, durable surface that’s completely customizable. Whether you prefer earthy browns, cool blues, or bold metallics, staining lets you match your bathroom’s color scheme perfectly.
Broken Tile Pattern
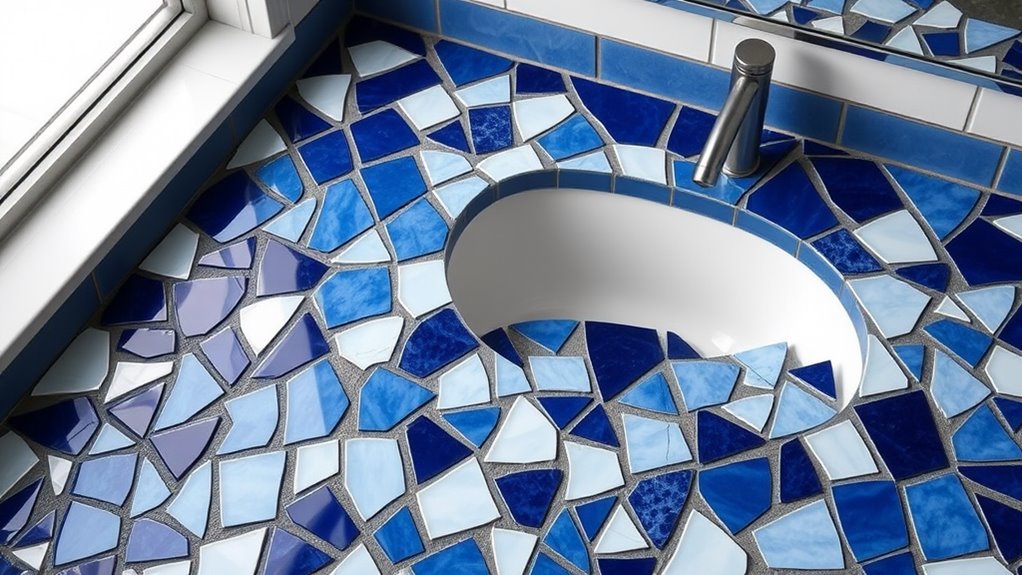
While stained concrete offers one path to creative countertops, broken tile patterns present another stunning DIY option. You can create a unique mosaic effect by carefully arranging broken ceramic tiles in your chosen colors and patterns. This technique, often called pique assiette, lets you upcycle old tiles or dishes, saving money while adding personality to your bathroom. Just arrange the pieces like a puzzle and grout between them.
Metallic Epoxy Pour
Elegance meets durability in metallic epoxy pour countertops, a modern DIY solution that creates stunning, marble-like surfaces. You’ll love how the metallic pigments swirl and dance through the clear epoxy as you pour it, creating unique patterns that catch the light. With proper preparation and mixing, you can transform your tired bathroom counter into a showstopping piece that’s waterproof and long-lasting.
Pressed Flower Resin
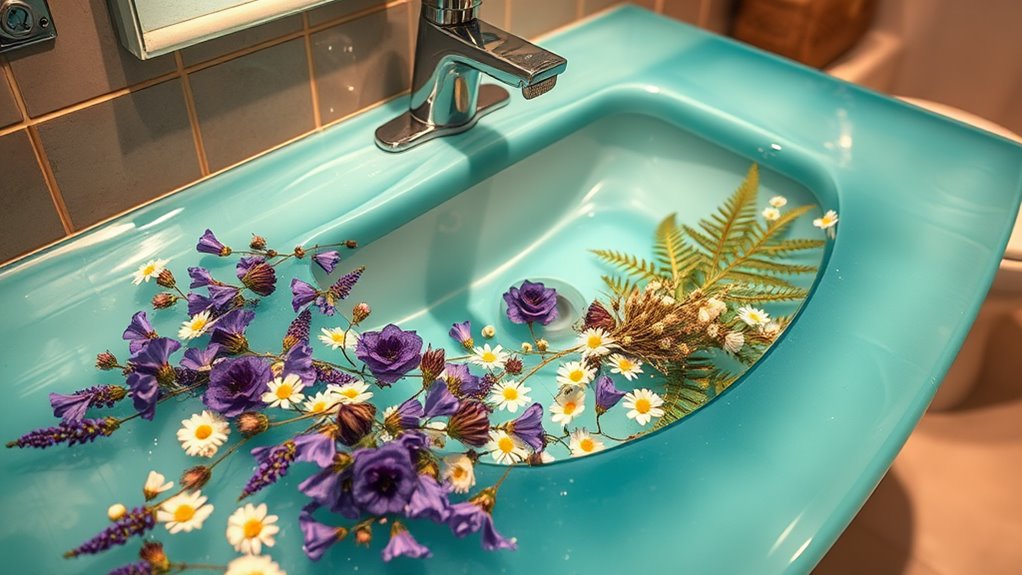
Botanical beauty comes alive in pressed flower resin countertops, where delicate blooms are forever preserved beneath a crystal-clear surface. You can create this stunning effect by arranging dried flowers on your existing countertop base, then carefully pouring layers of clear epoxy resin. Select flowers that complement your bathroom’s color scheme, and consider using local wildflowers or garden favorites for a personal touch.
Wine Cork Surface
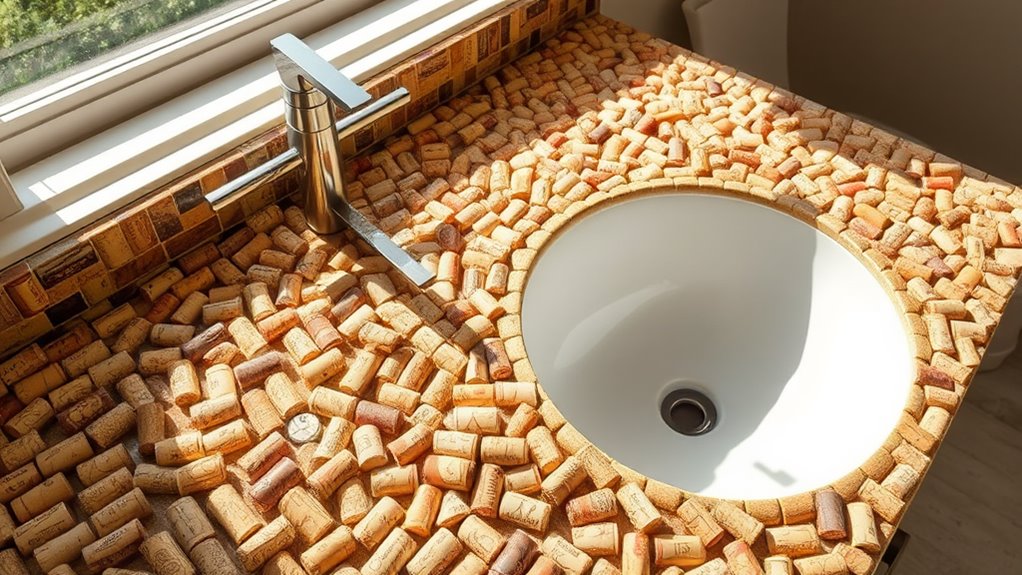
From natural elements to repurposed materials, a wine cork surface offers an eco-friendly and visually striking option for bathroom countertops. You’ll need to collect wine corks, slice them in half lengthwise, and arrange them in a pattern you love. Seal the corks with clear epoxy resin to create a waterproof surface that’s both durable and unique to your home.
Seashell Mosaic Design
Creating a seashell mosaic design transforms your bathroom countertop into a stunning coastal masterpiece. All you need are clean seashells, white mortar, grout, and a sealant. Start by arranging your shells in a pleasing pattern, then secure them with mortar. After it dries, fill the gaps with grout and finish with a waterproof sealant to protect your beachy creation.
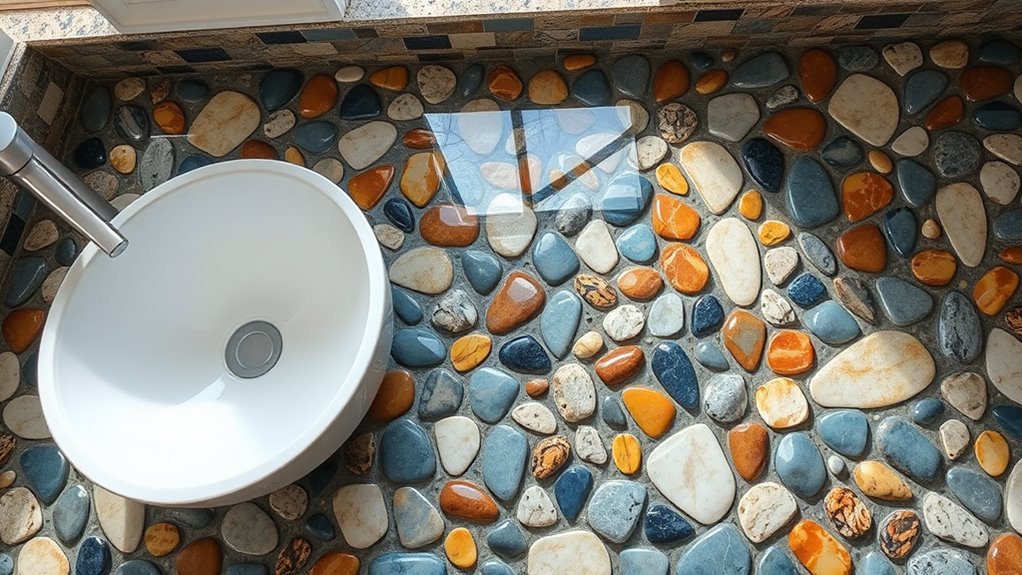
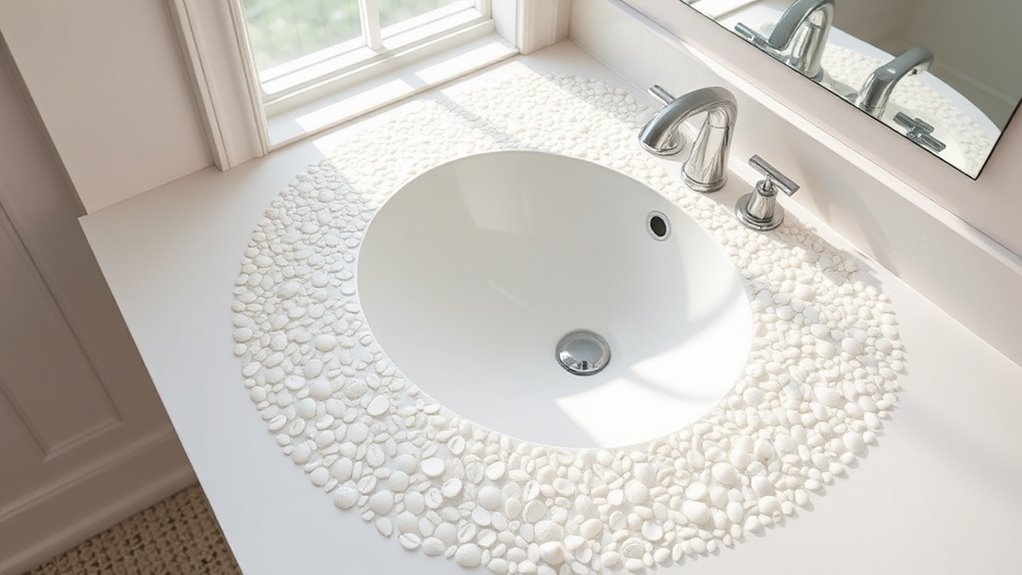
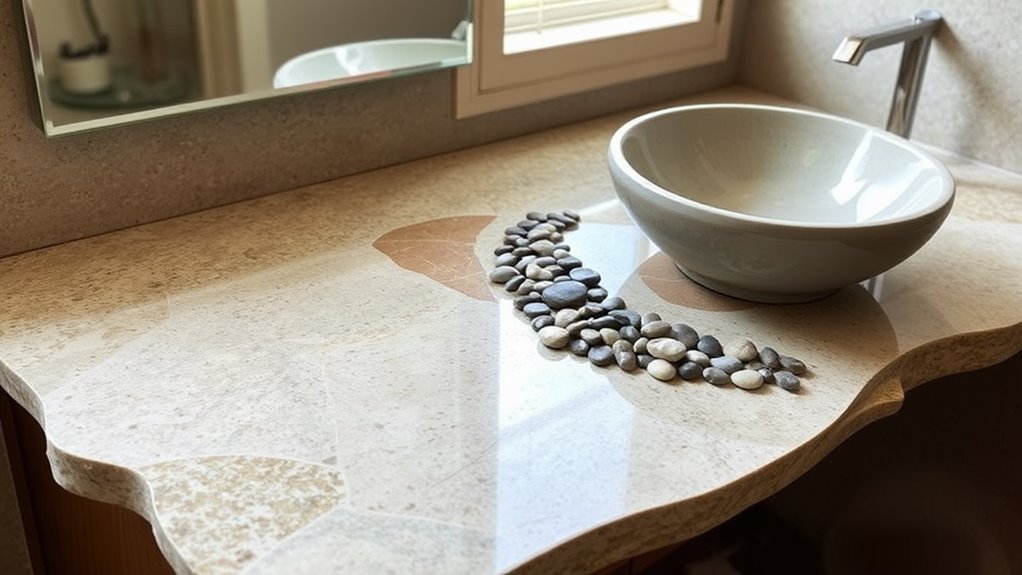
Pebble Inlay Pattern

A stunning pebble inlay pattern offers a spa-like aesthetic for your bathroom countertop while providing excellent durability. You can create this look by arranging smooth river rocks in a concrete base, sealing them properly to prevent water damage. Mix different sizes and colors of pebbles to create unique patterns that catch the eye. Your guests will love running their fingers across the natural texture.
Paper Bag Texture Finish
With ordinary brown paper bags and concrete sealer, you can achieve an elegantly textured countertop surface that mimics the appearance of natural leather. Simply crumple brown paper bags, then smooth them out and apply them to your countertop using concrete sealer. Once dry, add more layers of sealer for durability. The result is a unique, waterproof finish that’s both beautiful and budget-friendly.
Copper Penny Installation
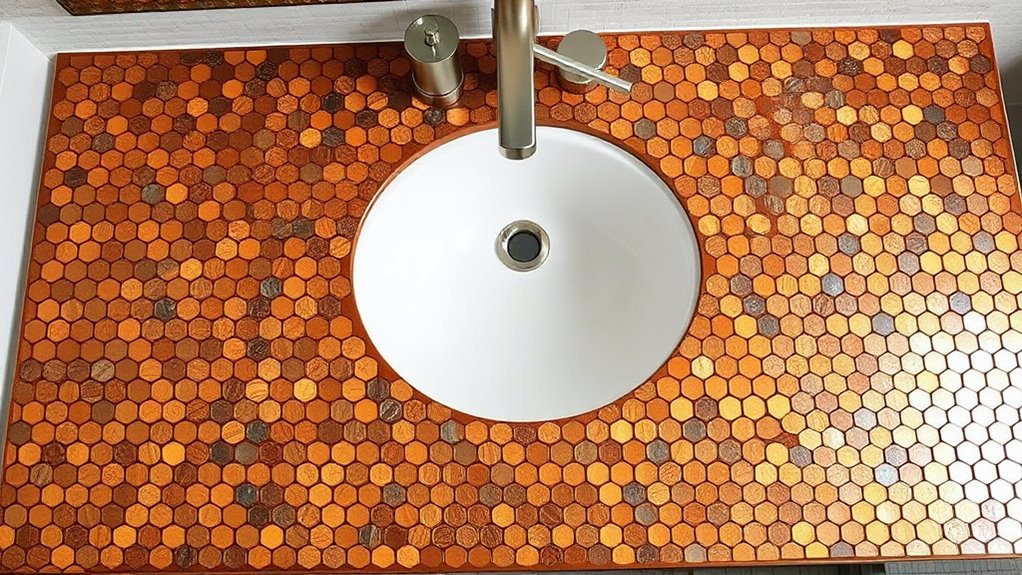
Transform your bathroom countertop into a stunning metallic masterpiece by installing hundreds of copper pennies in a mosaic pattern. You’ll need clean pennies, clear epoxy resin, and patience. Start by arranging your pennies in your desired pattern, making sure they’re level. Once satisfied, pour the epoxy over them, creating a smooth, waterproof surface that’s both eye-catching and durable.
Glass Bottle Mosaic

Recycled glass bottles can create a stunning mosaic countertop that captures and reflects light while adding unique character to your bathroom. You’ll want to collect colored glass bottles, carefully break them into small pieces, and arrange them in your desired pattern. Mix your glass pieces with clear epoxy resin, pour it over your countertop surface, and watch your one-of-a-kind creation come to life.
Stamped Concrete Surface
Stamped concrete offers another innovative approach to creating custom bathroom countertops at a fraction of traditional material costs. You can easily create unique patterns and textures using rubber stamps or textured mats pressed into wet concrete. Add your favorite colors with concrete stains or dyes, and seal the surface for durability. This DIY-friendly option lets you achieve the look of stone or tile without breaking the bank.
Natural Stone Arrangement
Creating a bathroom countertop with natural stone arrangements offers a sophisticated and timeless design solution for DIY enthusiasts. You can mix different stones like river rocks, pebbles, or slate pieces, setting them in clear epoxy resin. Simply arrange your chosen stones in a pattern you love, make certain they’re level, and pour the resin carefully. The result is a unique, nature-inspired surface that’s truly yours.
Bottle Cap Design
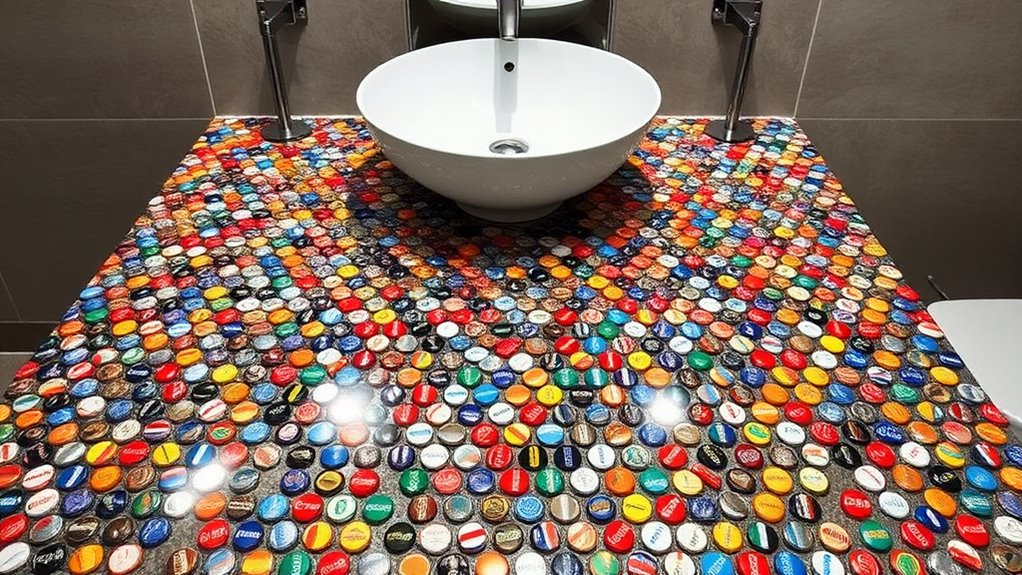
While natural stones bring an organic feel to bathroom countertops, bottle cap designs offer an edgy, industrial aesthetic that appeals to eco-conscious DIY enthusiasts. You can create unique patterns by arranging collected bottle caps and securing them with clear epoxy resin. This project not only gives your bathroom a conversation-starting focal point but also helps reduce waste by repurposing items that might otherwise end up in landfills.
Frequently Asked Questions
How Long Do DIY Bathroom Countertops Typically Last Before Needing Replacement?
DIY bathroom countertops typically last 5-15 years, depending on the materials used and how well you maintain them. Concrete countertops can last 10-15 years, while epoxy surfaces usually go 5-10 years. Tile countertops often reach 10+ years, and wood varieties last 5-8 years with proper sealing. Remember, regular cleaning, avoiding harsh chemicals, and fixing small damages quickly will help extend your countertop’s lifespan.
What Tools Are Essential for Removing an Existing Bathroom Countertop?
You’ll need a few basic tools to safely remove your bathroom countertop. Grab a utility knife to cut through caulk, a pry bar for lifting the surface, and a screwdriver to remove fasteners. Don’t forget safety gear like gloves and goggles. A putty knife helps scrape old adhesive, while a drill might be necessary for stubborn screws. Having a helper makes the job easier, especially when lifting heavy pieces.
Can DIY Bathroom Countertops Affect Home Resale Value?
DIY bathroom countertops can definitely impact your home’s resale value, either positively or negatively. A well-executed, high-quality DIY countertop using materials like concrete, granite tiles, or epoxy can boost your home’s appeal and value. However, poor workmanship or low-quality materials might turn off potential buyers. For the best return on investment, focus on using durable materials and maintaining professional-looking finishes that match current market trends.
Which DIY Countertop Options Are Best for High-Moisture Bathroom Environments?
Like a shield against splashing water and steamy showers, your bathroom countertop needs to be moisture-resistant. Concrete with proper sealing offers excellent durability, while epoxy resin creates a waterproof surface that’s easy to clean. Tile countertops, when properly grouted, handle moisture well and give you creative design options. For a budget-friendly choice, consider marine-grade plywood sealed with multiple layers of polyurethane for reliable water resistance.
How Much Money Can I Save by Doing a DIY Bathroom Countertop?
You can save anywhere from 40-70% of costs by tackling a bathroom countertop project yourself. For example, a professional quartz installation might cost $1,500, while a DIY concrete or epoxy countertop could run $300-500 in materials. Even premium DIY options like butcher block or tile typically stay under $700, saving you hundreds compared to professional installation.
