Building your own DIY hot tub isn’t as intimidating as you might think, and I’ll show you how to create your backyard oasis. Start by choosing a private, level spot with easy access to utilities, making sure you’ve checked local regulations. You’ll need a solid foundation that can support at least 115 pounds per square foot – concrete works great here. The walls come next, using concrete blocks with proper reinforcement, followed by careful plumbing and electrical setup. With waterproofing, tiling, and safety features in place, you’ll have a custom spa that costs under $10,000. Let’s break down each step to turn your hot tub dreams into reality.
Planning Your Perfect Hot Tub
Building your dream hot tub starts with careful planning and smart decisions about location, materials, and technical requirements. I’ll help you navigate these vital first steps to guarantee your DIY project succeeds.
First, let’s talk location. You’ll want a spot that’s private yet accessible, with easy access to electrical and water connections. I’ve learned the hard way that placing a hot tub under trees is a recipe for endless cleaning – those falling leaves are no joke!
Make sure you’ve got a flat, level surface that can handle the weight of your tub, water, and happy soakers. Most DIY hot tubs can be constructed for under $10,000 with proper planning.
Now, consider your material options. Whether you’re leaning toward classic concrete blocks, rustic cedar boards, or even a creative solution like a repurposed stock tank, each choice has its pros and cons.
I always recommend checking local regulations before making your final decision – nothing dampens hot tub dreams quite like permit problems!
Don’t forget the technical stuff: proper electrical grounding, water supply planning, and a solid foundation are must-haves.
And while you’re sketching out your design, think about those little extras that’ll make your tub special – maybe some strategically placed jets or a perfect view of the sunset.
Building a Solid Foundation

A solid foundation is the most essential component of your DIY hot tub project. I’ve seen too many hot tubs fail simply because someone skipped this vital step. Trust me, you don’t want your relaxing soak to turn into a tilting disaster!
I’ll help you choose between the four main foundation types: concrete, gravel, paver stones, or pre-made bases. For most DIYers, I recommend either concrete or gravel. Concrete’s my top pick if you’re looking for ultimate stability – just make sure it’s at least 4 inches thick with some rebar mixed in for extra strength. Your foundation must support at least 115 pounds per square foot.
If you’re worried about drainage, a gravel base might be your best bet.
Before you start laying any foundation, you’ll need to prep your site properly. I always start by clearing the area and removing topsoil. Then, I check that the ground’s perfectly level – this isn’t the time to eyeball it!
Add a layer of compacted crushed rock, and you’re ready to build your chosen foundation. Remember, taking extra time now will save you countless headaches down the road.
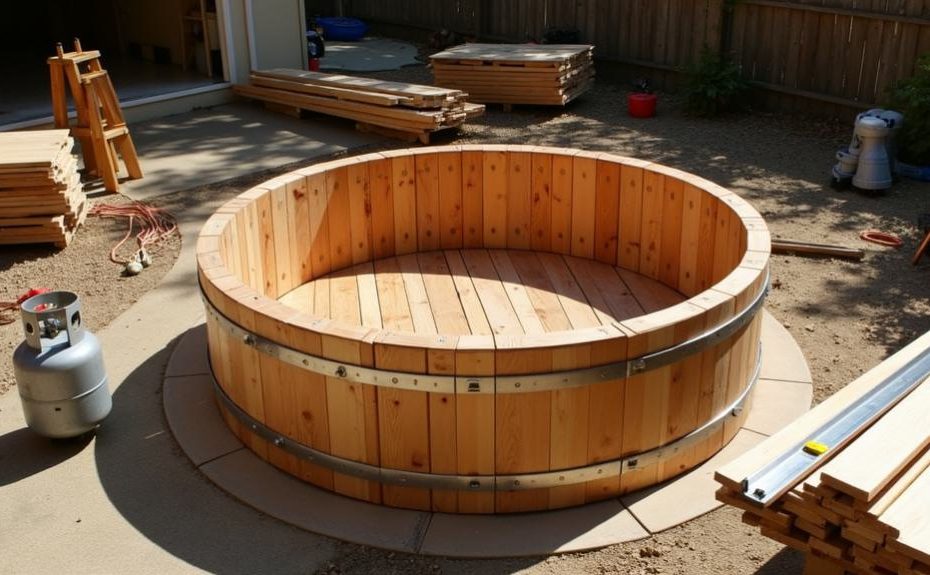
Walls and Structure Assembly

With your foundation set and level, it’s time to construct the walls of your DIY hot tub. I’ll guide you through the most reliable method using concrete blocks, which provides excellent durability and stability for your home spa project. Building codes and regulations must be carefully followed during wall construction.
First, you’ll want to lay your blocks around the perimeter using 4-inch wide concrete blocks. I recommend using the CMU block method because it’s both cost-effective and sturdy. You’ll strengthen these walls by placing rebar in every other hole and filling them with concrete – trust me, you’ll want that extra reinforcement when thousands of gallons of water are pushing against those walls!
Here’s my tried-and-true process for ideal wall construction:
- Position rebar vertically, tying it into your foundation.
- Stack your blocks carefully, ensuring they’re perfectly level.
- Create space for plumbing by planning hole locations before filling blocks.
- Fill blocks with concrete in stages, allowing each layer to set.
Remember to include a 6-inch cavity within your walls for plumbing and insulation.
I’ve found that this dual-skin approach, while taking a bit more time, pays off in both structural integrity and energy efficiency.
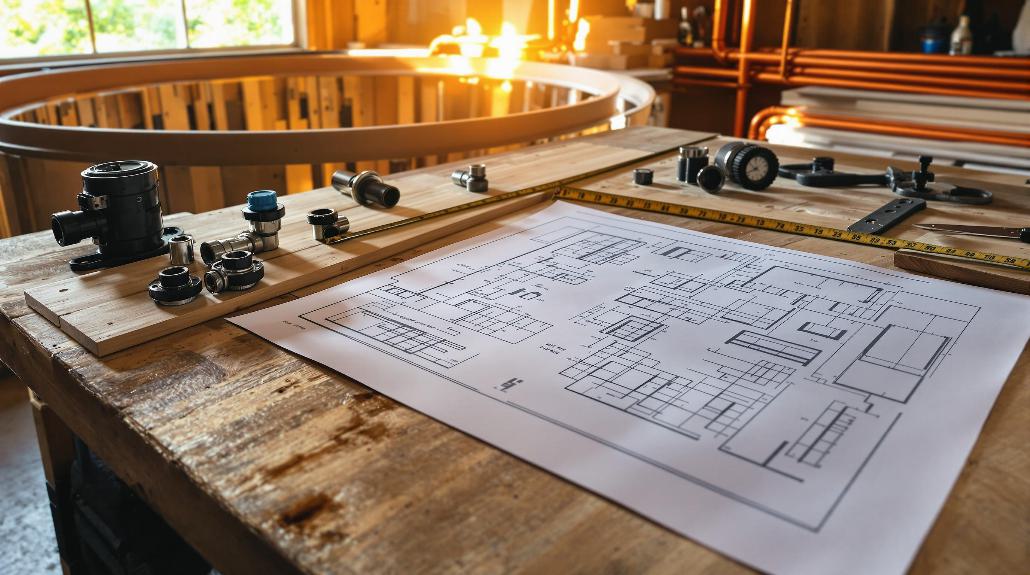
Plumbing and Electrical Setup
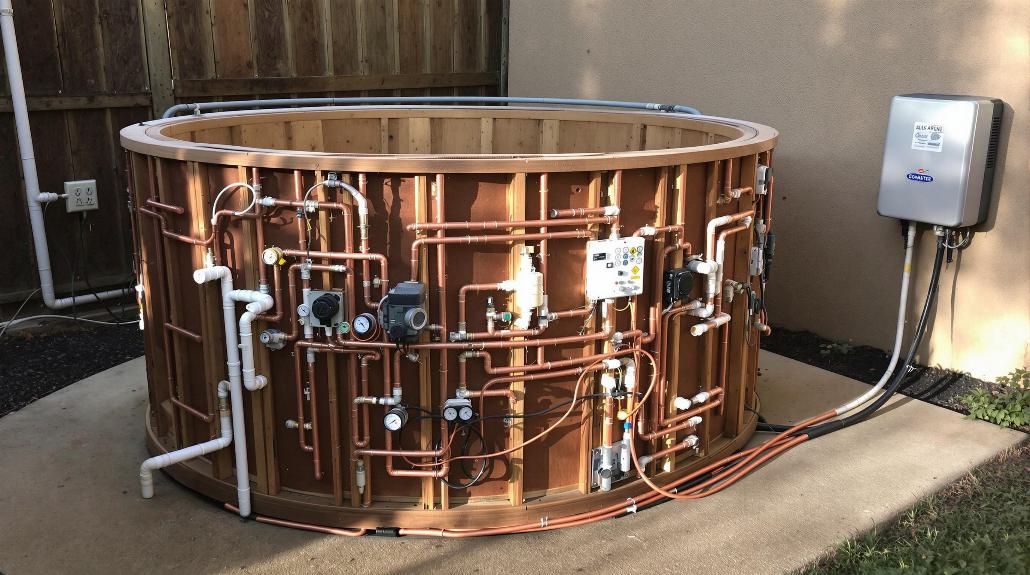
Once you’ve completed the wall structure, proper plumbing and electrical setup becomes vital for a functioning hot tub system.
I’ll help you understand the dual pipe system, which uses separate lines for water and air that mix in the gunite jet bodies. You’ll need 2-inch pipes for water and 1.5-inch pipes for air – trust me, size matters here!
Start by planning your control room location, as this affects your entire layout. I always recommend keeping pipe runs as short as possible for better pressure.
When connecting pipes, I can’t stress enough how important it’s to use plenty of PVC cement and insert them fully into the sockets – about 3 cm deep should do it. One rookie mistake I see often is skimping on joint construction, which leads to leaks later.
For the electrical components, you’ll need to carefully integrate your pump, blower, and heating system.
I’ve learned that proper placement of skimmers at the top is essential – they need to align perfectly with your deck.
Final Touches and Safety
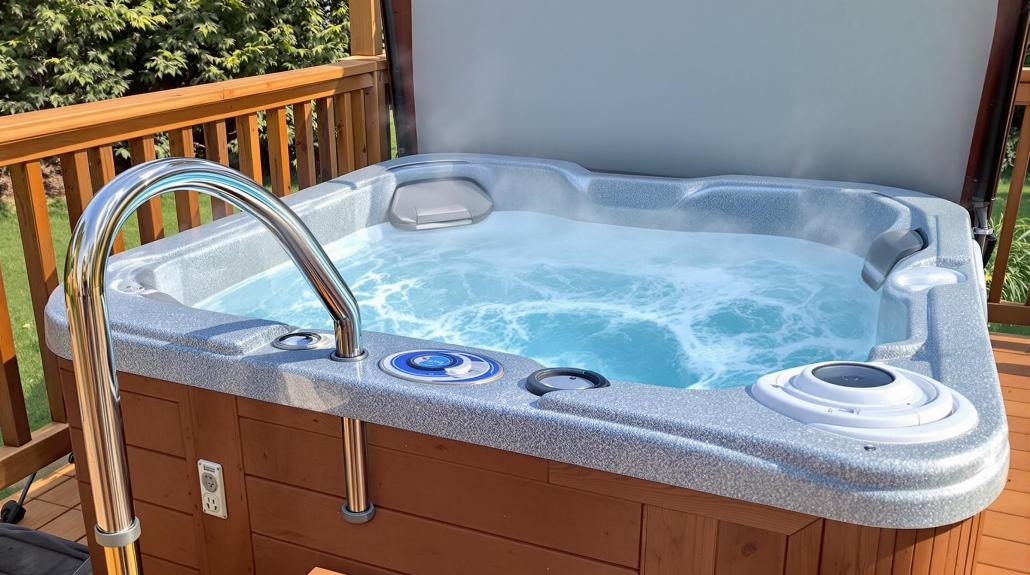
Now that your plumbing and electrical systems are in place, let’s focus on the finishing steps that will make your hot tub safe and ready for use.
I’ll guide you through the essential final touches that’ll guarantee your DIY project is both comfortable and secure.
Before applying any finishes, you’ll need to test the structure and make necessary adjustments.
I recommend using waterproof render to skim the interior surface, followed by tiling for a professional look.
Don’t forget to add insulation – it’ll help maintain water temperature and save on energy costs.
Here are the key safety measures you can’t skip:
- Position your tub away from heat sources and potential hazards
- Secure the entry step firmly to prevent accidents
- Install proper drainage to avoid water pooling
- Use appropriate covers and tarps to keep debris out
For long-term success, I suggest creating a maintenance schedule right away.
Plan to clean the shell weekly with white vinegar, test water chemistry regularly, and inspect the jets monthly.
I’ve found that keeping spare filters on hand makes maintenance much easier – you won’t have any downtime while cleaning the originals.
Frequently Asked Questions
How Long Can I Expect My DIY Hot Tub to Last?
Want to know how long your DIY hot tub adventure will last?
I’d say with proper maintenance, you can expect 10-15 years of bubbly bliss.
I’ve found that using quality materials like cedar or redwood makes a huge difference.
If you’re diligent about water chemistry and replace components like pumps and heaters when needed, you might even stretch it past 20 years of splashing good times.
Can I Build a Hot Tub on a Sloped Surface?
Yes, you can build a hot tub on a sloped surface, but you’ll need to do some extra preparation.
I recommend using crushed stone or type 1 gravel to create a level base, building up the low end to match the high side.
You’ll want at least 4 inches of gravel, properly compacted, and a frame made of pressure-treated lumber secured with rebar stakes.
It’s essential to get the base perfectly level to prevent any structural issues.
What Permits Do I Need Before Starting Construction?
Whether you’re building in-ground or above-ground, I’ll tell you straight: permits aren’t optional, they’re essential.
I’d start by checking with your local building department for specific requirements. In most areas, you’ll need electrical and plumbing permits, while in-ground installations require additional building permits.
Don’t forget – if you’re adding a deck or fence, those’ll need separate permits too. The process might seem intimidating, but it’s far better than facing fines later.
Will Building My Own Hot Tub Really Save Money?
I can tell you from experience that building your own hot tub typically saves 50-60% compared to buying new.
While a traditional hot tub costs $5,000+, you can build one for around $2,000-2,500.
Plus, if you install an air source heat pump, you’ll save up to 66% on running costs.
Just remember that customization can quickly drive up expenses if you’re not careful with your choices.
Can I Convert an Existing Pool Into a Hot Tub?
Just like transforming a cozy cottage into a grand mansion, converting a pool into a hot tub isn’t always straightforward, but I’m happy to tell you it’s definitely possible!
I’ve found that pools with concrete construction are your best bet, as they’re sturdy enough for the conversion.
You’ll need to add proper insulation, a heating system, and updated filtration.
While it’s a big project, you’ll save money compared to building a new hot tub from scratch.
