When it comes to transforming your living room, wall art serves as a powerful focal point that can define the entire space. While professional pieces often come with hefty price tags, DIY alternatives offer both creative freedom and budget-friendly solutions.
From the fluid movements of paint pour canvases to the intricate patterns of geometric string art, these twenty handcrafted options blend artistic expression with personal style. Whether you prefer botanical elements, textural pieces, or modern designs, these carefully curated ideas will inspire your next home decorating project.
Abstract Paint Pour Canvas
Transform your living room into a gallery-worthy space with a stunning abstract paint pour canvas. You’ll love how easy it is to create this eye-catching artwork using acrylic paints, a canvas, and your creativity.
Simply mix your favorite colors with a pouring medium, layer them in a cup, and watch the magic happen as you flip it onto the canvas. The swirling patterns create unique, mesmerizing results every time.
Pressed Botanical Gallery Wall
Bring nature indoors with an elegant pressed botanical gallery wall that showcases the delicate beauty of flowers, leaves, and ferns. You’ll need to carefully press your chosen plants between heavy books for several weeks.
Once dried, arrange them in matching frames with neutral mats. Mix different sizes and plant varieties to create visual interest, and hang them in a balanced cluster formation.
Geometric String Art
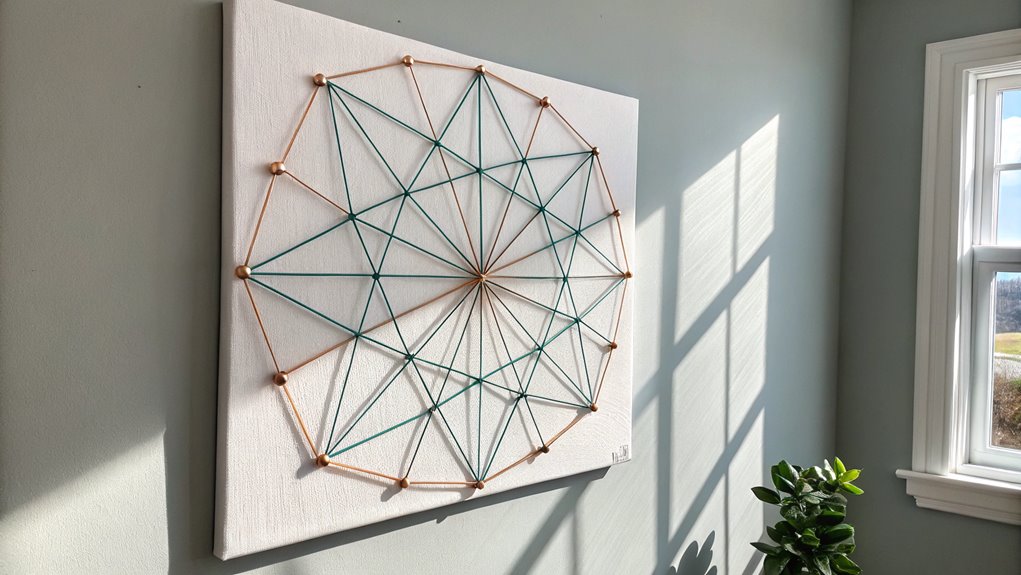
Modern geometric string art offers a striking way to add dimension and visual intrigue to your living room walls. All you need are wooden boards, nails, and colorful string or thread.
Simply map out your design, hammer small nails along the pattern lines, then weave string between the nails to create eye-catching shapes. You can craft diamonds, stars, or abstract patterns that match your decor.
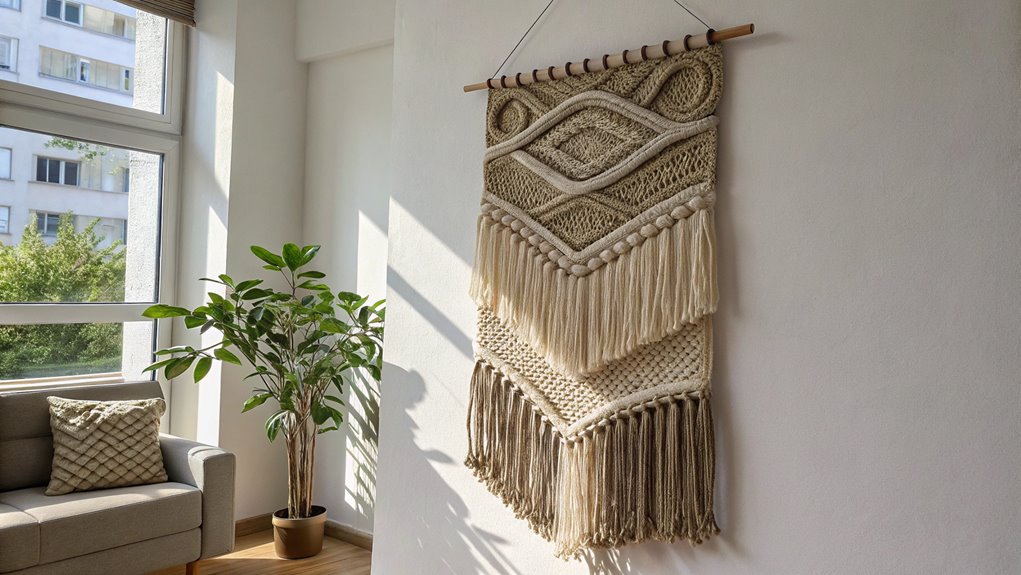
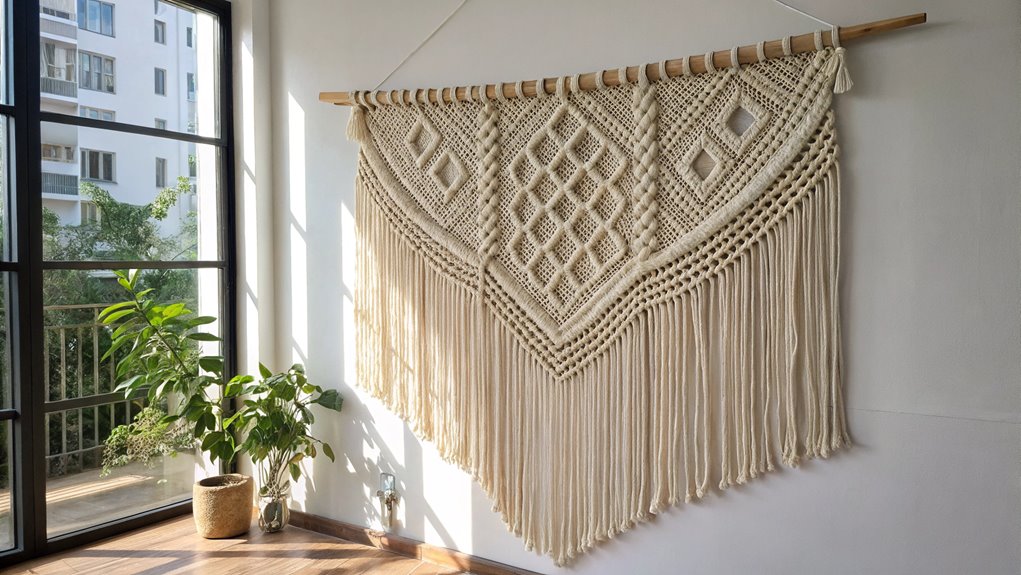
Oversized Woven Wall Hanging
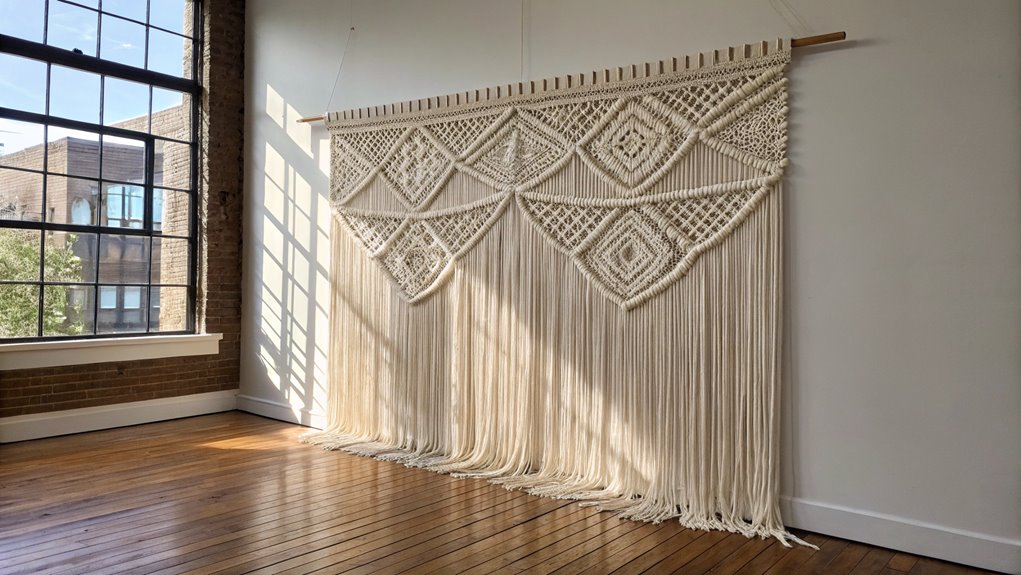
While geometric string art embraces clean lines and precision, oversized woven wall hangings offer a softer, more organic aesthetic. You can create stunning textile art using a large wooden dowel or branch as your base, then weaving yarn, rope, or fabric strips in various textures and colors. Mix neutral tones with pops of color to match your room’s palette and add tassels for extra flair.
Vinyl Record Display

Vintage vinyl records transform into stunning wall art when thoughtfully arranged and displayed. You can create eye-catching geometric patterns or opt for a simple row display using album covers that match your room’s color scheme.
Mount your records securely using special vinyl hanging frames or clear acrylic holders, keeping them safely preserved while showcasing your musical taste and adding retro charm.
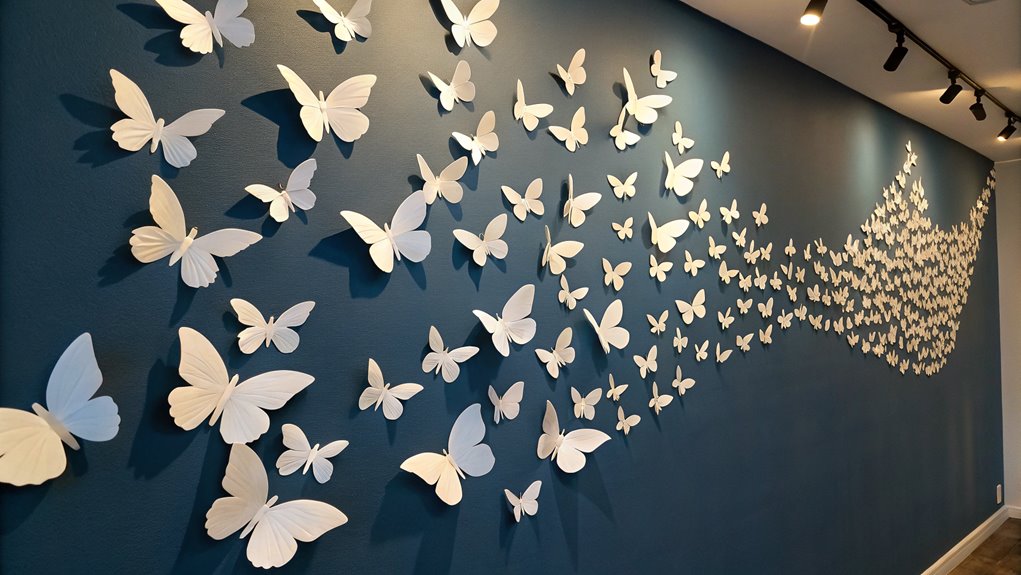
Floating Paper Butterfly Collection
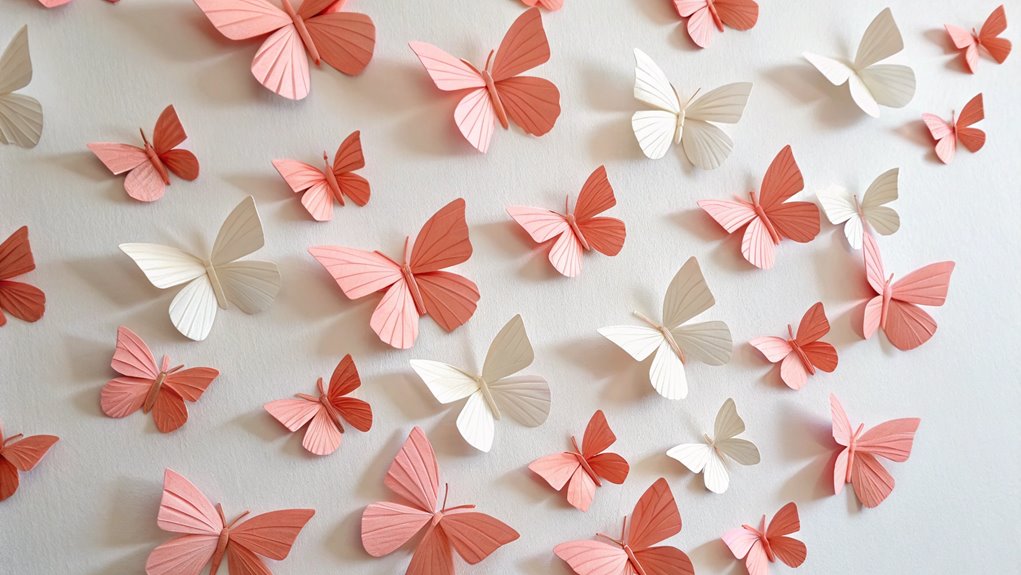
Elegant and ethereal, a floating paper butterfly collection offers a lighter approach to wall decor compared to solid record displays. You can create this eye-catching piece using colored paper, wire, and basic crafting tools.
Simply cut butterfly shapes in various sizes, fold their wings slightly upward for dimension, and mount them on your wall in a swirling pattern using clear adhesive dots.
Recycled Wood Wall Panels
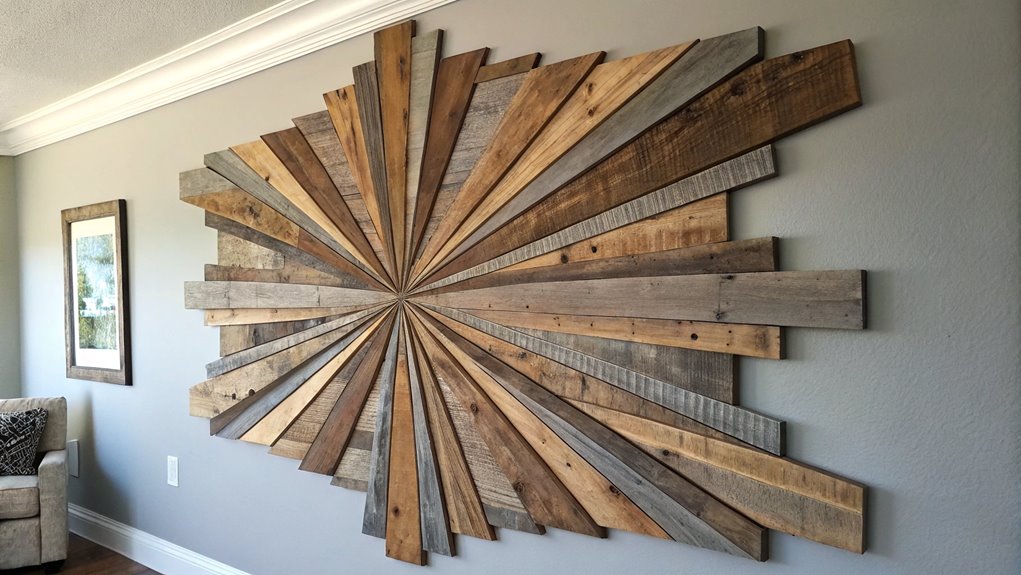
From rustic charm to modern sophistication, recycled wood wall panels transform living spaces with their unique character and environmental consciousness. You can create stunning focal points by arranging salvaged boards in geometric patterns or random layouts.
Paint them in soft pastels for a beachy vibe, or keep their weathered patina for that farmhouse feel. The possibilities are endless with this eco-friendly decor option.
Mixed Media Collage
Mixed media collage’s versatility makes it an engaging choice for living room wall art, combining various materials like paper, fabric, photographs, and found objects into a unified composition.
You can layer your favorite magazine clippings, textured fabrics, and meaningful photos onto a canvas, adding depth with buttons, ribbons, or dried flowers. Create themes that reflect your personality or tell your family’s unique story.
Yarn Wall Tapestry
Modern yarn wall tapestries offer a stunning way to add texture and warmth to your living room walls while expressing artistic creativity.
You can create beautiful designs using simple materials like wooden dowels, colorful yarn, and basic weaving techniques. Start with geometric patterns or free-form waves – whatever suits your style. The best part? If you make a mistake, just unravel and try again!
Photo Transfer on Wood
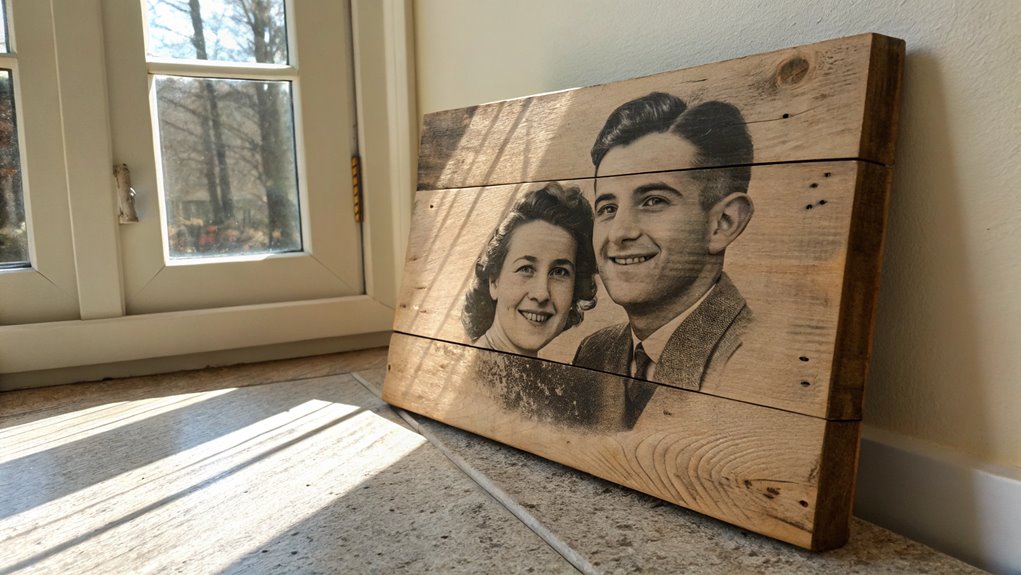
Photo transfer on wood transforms cherished memories into rustic wall art that adds character to any living room. You’ll need your favorite photos, mod podge, and a piece of light-colored wood.
Simply print your photos in reverse on regular paper, apply mod podge to the wood, place the image face down, and gently rub away the paper backing. The result is beautifully weathered and uniquely yours.
Paper Quilling Display
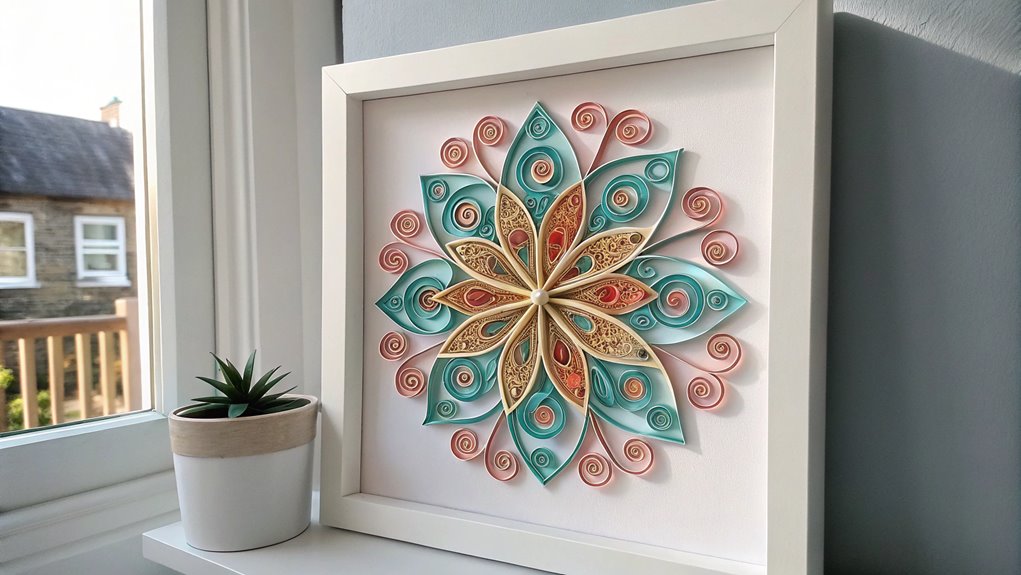
While wood art celebrates photographs, paper quilling elevates simple strips of paper into intricate wall displays. You can create stunning designs by rolling, coiling, and shaping paper strips into flowers, abstract patterns, or even letters.
Mount your quilled masterpiece in a shadow box frame to add depth and protect your work. The results are eye-catching conversation pieces that look far more expensive than their materials suggest.
Vintage Map Gallery
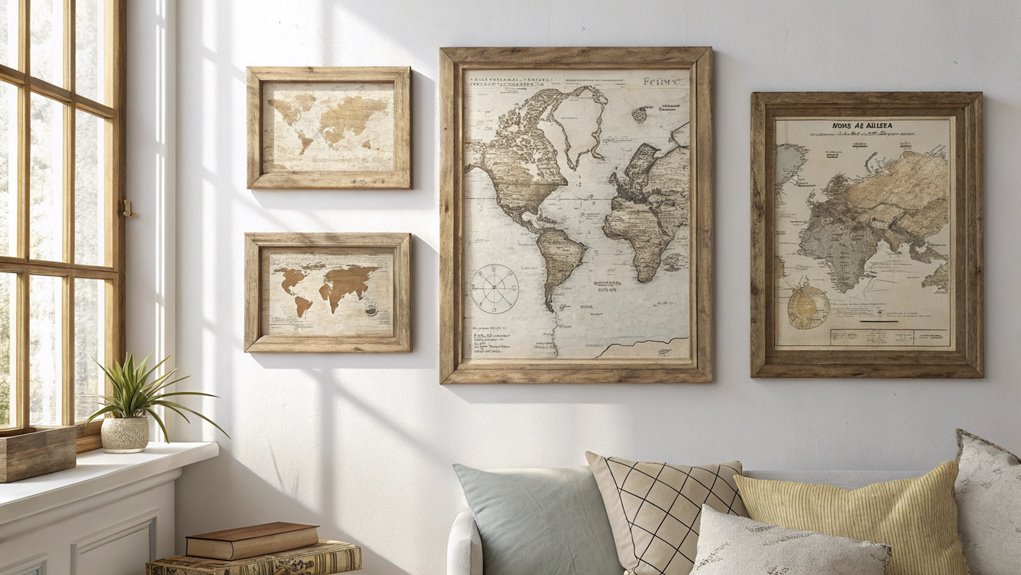
Travel-inspired decor takes on an artistic dimension when you curate a collection of vintage maps for your living room walls. You can mix different sizes and styles of maps, from old nautical charts to antique city plans.
Frame them in coordinating colors, or try weathered wood frames for a rustic touch. Group your maps in a grid or creative cluster for maximum visual impact.
Painted Wooden Mandala
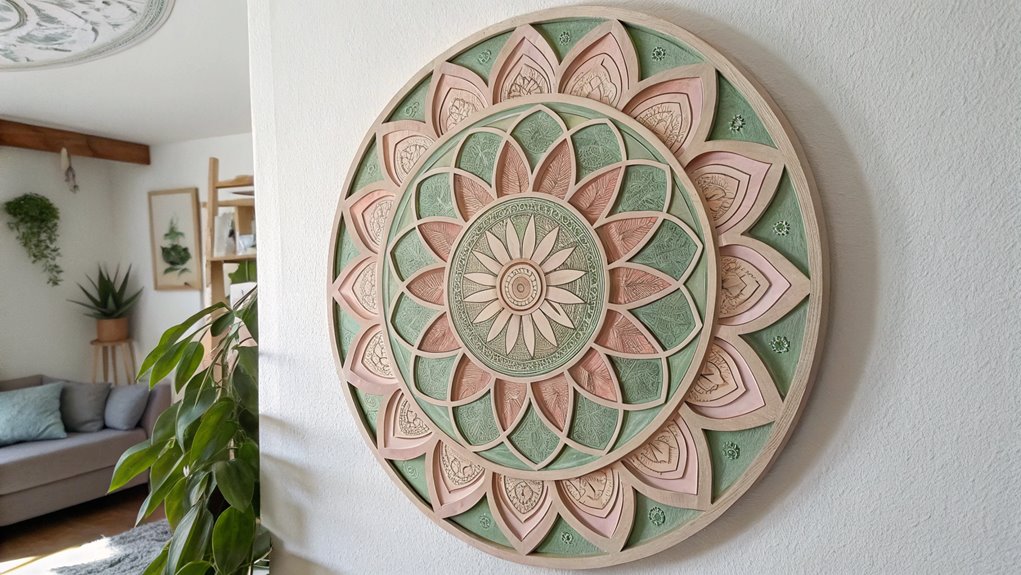
A painted wooden mandala brings sacred geometric patterns to life as a striking focal point for your living room wall. You can create this stunning piece using a round wooden board, acrylic paints, and basic tools.
Start with a simple design in the center and work your way outward with increasingly intricate patterns. Choose colors that complement your room’s existing decor.
Framed Fabric Art
Creating elegant wall decor with framed fabric art offers an accessible yet sophisticated approach to personalizing your living space.
Choose fabrics that complement your room’s color scheme – from vintage scarves to designer remnants. Simply stretch your chosen fabric over a foam board, secure it with fabric glue, and place it in a frame. You’ll have stunning, custom artwork in minutes.
Floating Branch Installation
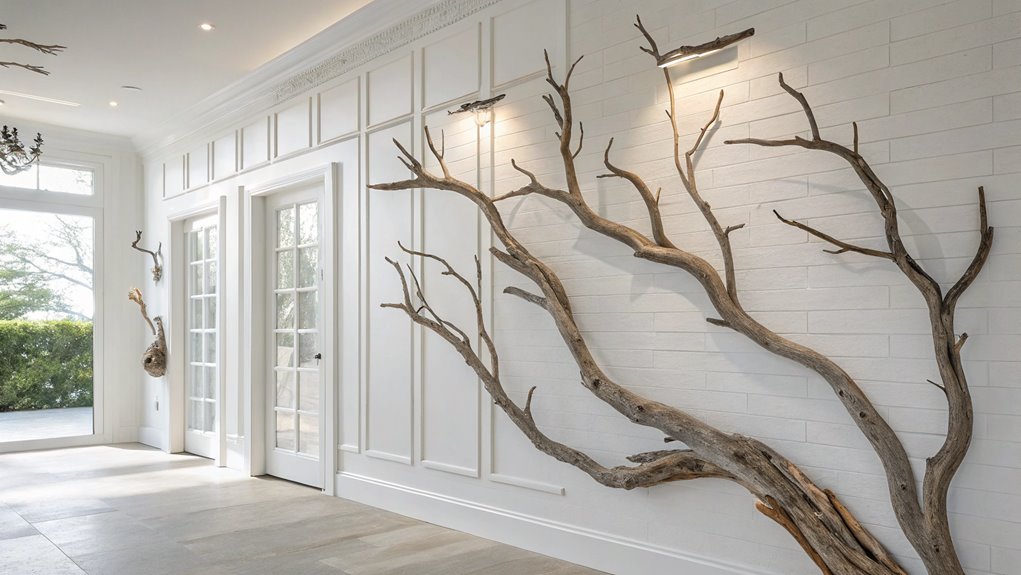
Natural elements frequently transform living spaces into serene sanctuaries, and floating branch installations offer a striking way to bring the outdoors inside.
You can create this eye-catching display by selecting beautiful branches, securing clear fishing line to them, and hanging them at varying heights from your ceiling. Paint them white for a modern look, or leave them natural for rustic charm.
Metallic Foil Typography
Modern typography’s appeal reaches new heights when enhanced with metallic foil, offering a luxurious yet achievable DIY wall art option.
You can create stunning word art using adhesive metallic foil sheets and your favorite quotes or phrases. Simply print your design using a laser printer, lay the foil over it, and use a laminator or hot iron to transfer the metallic finish onto your artwork.
Hanging Plant Grid
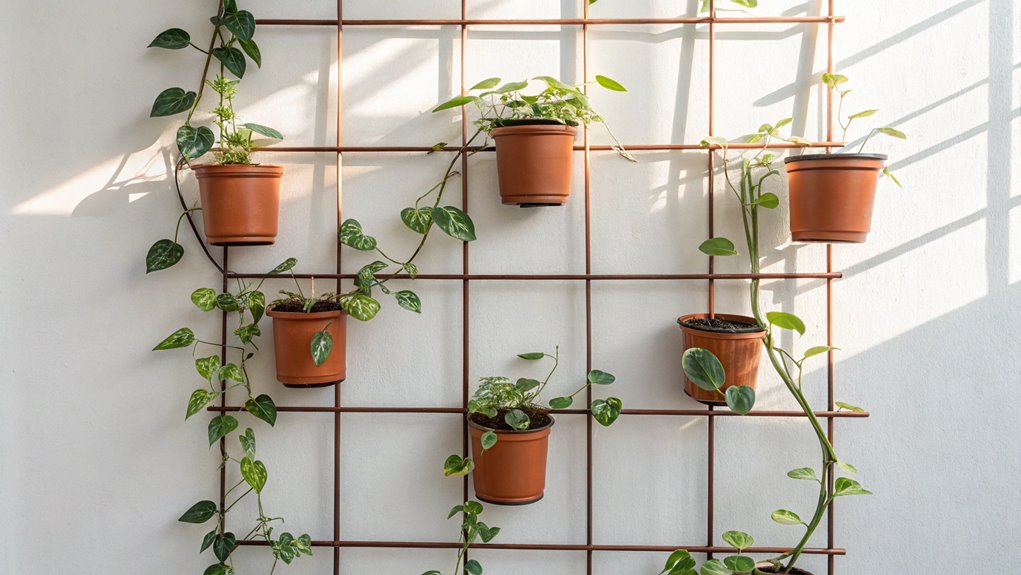
A stunning vertical garden display transforms your living room wall into a living, breathing work of art through a thoughtfully arranged grid of hanging plants.
Create this eye-catching feature by installing a wire mesh grid and securing small potted plants with hooks or twine. Mix different varieties like pothos, ferns, and air plants for visual interest. You’ll have a unique, nature-inspired focal point that purifies your air while beautifying your space.
Reclaimed Window Frame Art

Looking for a charming way to blend vintage character with contemporary decor? Transform an old window frame into stunning wall art by displaying family photos, pressed flowers, or artwork behind its glass panels. You can paint the frame to match your color scheme or leave it weathered for rustic appeal. Add fairy lights around the edges for extra warmth and ambiance in your living space.
Macramé Wall Piece
Texture and elegance combine beautifully in macramé wall pieces, making them perfect focal points for living room decor. You’ll love how these woven cotton or jute creations add a bohemian touch to your space. With simple knot patterns and basic supplies from your local craft store, you can create stunning wall art that reflects your personal style and adds warmth to your room.
Layered Paper Sculpture
While traditional wall art often relies on flat surfaces, layered paper sculptures bring mesmerizing depth and dimension to your living room walls. You can create stunning 3D designs by stacking and arranging paper shapes in varying heights and patterns.
Choose colors that complement your room’s palette, and experiment with geometric forms, nature-inspired motifs, or abstract compositions for a unique artistic statement.
Frequently Asked Questions
How Do I Protect Wall Art From Fading in Direct Sunlight?
To protect your wall art from sun damage, use UV-protective glass or acrylic when framing, or apply UV-protective sprays to unframed pieces. Consider installing solar films on your windows, which block harmful rays while letting in light.
You can also rotate your artwork periodically or hang it away from direct sunlight. Another option is using fade-resistant inks and materials when creating new pieces.
What’s the Best Lighting Setup to Showcase DIY Wall Art Pieces?
For ideal wall art display, layer your lighting with a combination of track lights and picture lights. Position track lights about 24-30 inches from the wall, angled at 30 degrees to minimize glare. Add adjustable picture lights mounted directly above larger pieces for dramatic emphasis. Dimmable LED bulbs in warm white (2700-3000K) work best, letting you control brightness and create the perfect ambiance for different times of day.
How High Should I Hang Wall Art Above Furniture?
When hanging art above furniture, follow the 6-8 inch rule: position your piece about 6-8 inches above your sofa, bed, or console table. For larger artworks, you can go up to 10 inches. Make sure the artwork’s width is proportional to the furniture below it – ideally around 2/3 to 3/4 of the furniture’s width. Trust your eye and step back to check the balance.
Can I Use Command Strips Instead of Nails for Heavy Pieces?
While Command strips are convenient, they’re not always reliable for heavy artwork. For pieces over 16 pounds, you’ll want to use proper wall anchors and nails instead. If you’re set on using Command strips, look for their heavy-duty versions that can hold up to 16 pounds, but always use multiple strips and follow weight guidelines carefully. Consider your wall surface too – they work best on smooth, clean walls.
How Do I Prevent Dust Accumulation on Textured Wall Art?
To keep textured wall art dust-free, use a soft microfiber duster or feather duster weekly for gentle cleaning. For deeper cleaning, try a handheld vacuum with a brush attachment on low power. You can also lightly mist the piece with a static-reducing spray to repel dust. Consider placing an air purifier nearby, and keep windows closed during high-pollen days to minimize dust buildup.
