Building your own mattress gives you complete control over your sleep comfort while potentially saving thousands. I’ll show you how to select high-quality materials like latex, memory foam, and organic cotton to create a personalized sleeping surface that’s perfect for your needs. You’ll need basic tools like a utility knife and measuring tape, plus quality adhesives to connect the layers. Regular maintenance, including rotation and cleaning every 3-4 months, will extend your DIY mattress’s life. Whether you’re seeking eco-friendly options or custom comfort layers, there’s so much more to discover about crafting your perfect night’s sleep.
Why Build Your Own Mattress
Building your own mattress offers unique advantages that mass-produced options simply can’t match. When you create a custom mattress, you’re in complete control of every layer, material, and comfort feature. The ability to select sustainable materials like organic cotton and natural latex creates a healthier sleeping environment.
I’ve found that this level of customization means you’ll get exactly what your body needs, from perfect spinal alignment to targeted pressure point relief.
Let’s talk about your wallet – building a custom mattress can actually save you money compared to those fancy store-bought options. You’ll choose affordable materials that work best for you, and since you’re building it yourself, there’s no markup for brand names or middlemen.
Plus, you’re doing the environment a favor by selecting eco-friendly materials and reducing waste.
Here’s what really matters: your health and comfort. I can’t stress enough how transformative a properly supported night’s sleep can be.
When you build your own mattress, you’re crafting something that addresses your specific aches, pains, and sleep preferences. Got allergies? No problem – you’ll pick materials that won’t trigger reactions.
It’s like having a sleep scientist and a craftsperson rolled into one – and that person is you!
Essential Materials and Tools
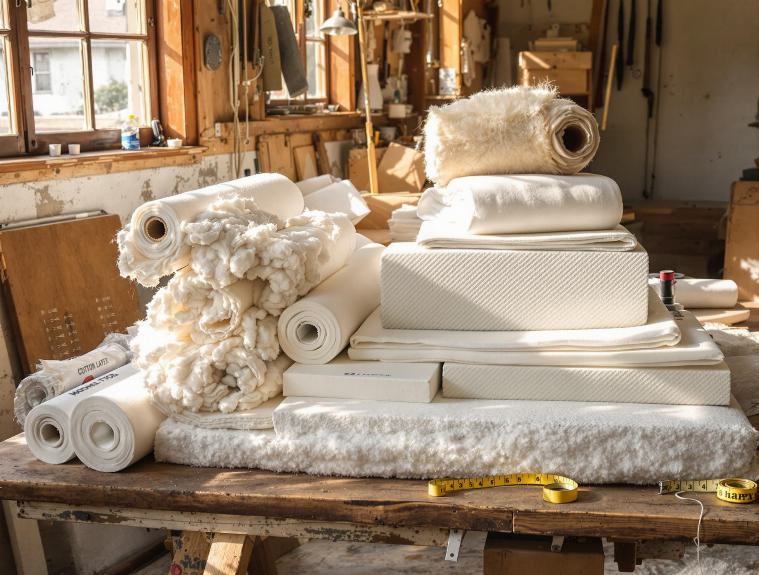
I’ll show you how to select the perfect core materials for your DIY mattress, from supportive base foams to cozy comfort layers that’ll help you sleep like a baby.
You’ll need specific tools to bring your mattress dreams to life, including precise cutting implements and reliable measuring equipment that guarantee professional-quality results.
While gathering these materials might seem intimidating, I’ll guide you through smart shopping strategies that’ll help you find quality components without breaking the bank. Our materials list focuses on 100% natural materials to ensure your mattress is free from harmful chemicals and synthetics.
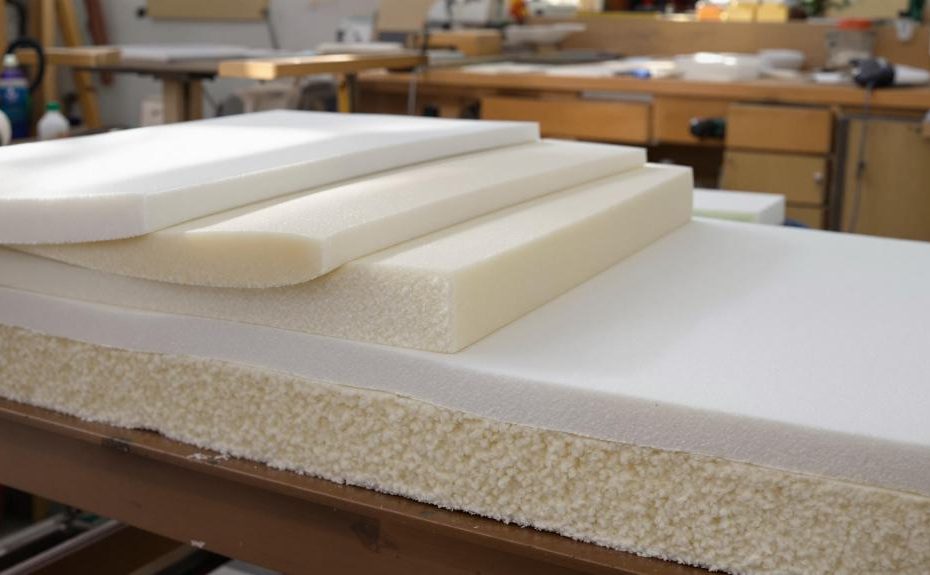
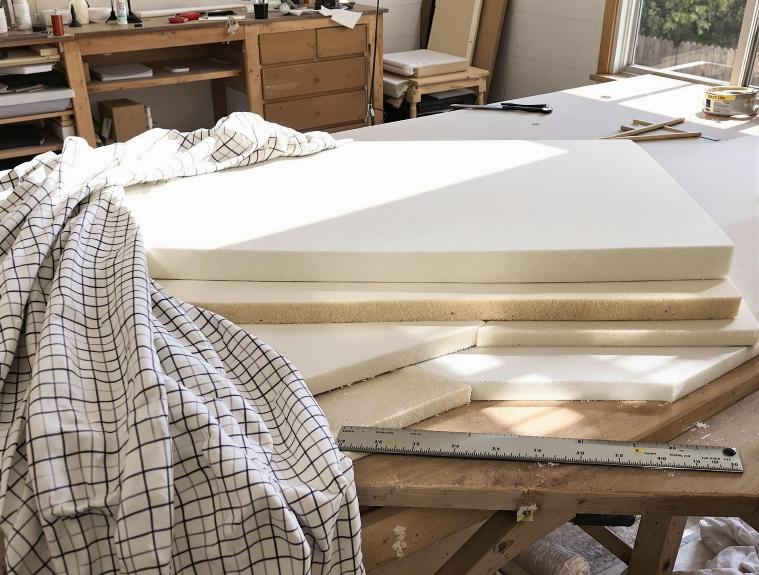
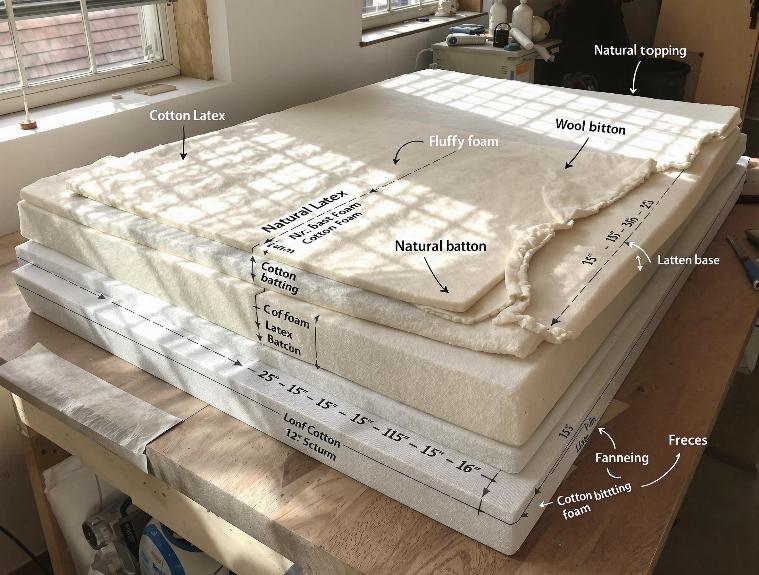
Core Material Selection Basics
Along with proper tools and planning, selecting the right core materials stands as the foundation of any successful DIY mattress project. I’ll help you understand the key materials that’ll make your mattress comfortable and long-lasting.
| Material | What It’ll Do For You |
|---|---|
| Latex | Gives you that bouncy support while being eco-friendly |
| Memory Foam | Hugs your body’s curves, perfect for those achy joints |
| Poly Foam | Works great as a budget-friendly base layer |
| Natural Fibers | Keeps you cool when you’re trying to catch those Z’s |
| High-Density Foam | Holds everything together like a champ |
When I’m crafting mattresses, I always consider the density and thickness of materials first. You’ll want to think about layering – start with a firm support base and work your way up to softer comfort layers. Trust me, your back will thank you! For the best results, I recommend combining different materials. Maybe try a high-density foam base with a memory foam middle layer and a natural fiber top layer. It’s like making a comfort sandwich, and you’re the chef who gets to decide how firm or soft each layer should be. All foam materials used should have CertiPUR-US® certification to ensure safety and health standards are met.
Tools For Assembly
Ready to tackle your DIY mattress project? I’ll walk you through all the essential tools you’ll need to make this project a success.
Let’s break it down into categories so you won’t miss anything significant. You may also want to include a Kreg pocket hole jig for additional construction options.
For cutting your materials, you’ll want either a reciprocating saw with a foam blade or a bread knife (I’ve used both, and they work great). Don’t forget your utility knife and razor blade for precise work.
When it comes to joining everything together, you’ll need fabric adhesive, thread, and maybe some Velcro strips or zippers if you’re planning a removable cover.
Accuracy is vital, so I always keep my measuring arsenal ready: a ruler, tape measure, and square for those perfect corners. Trust me, you don’t want a wonky mattress!
I’ve learned the hard way that safety gear isn’t optional – grab some gloves and safety glasses before you start.
And here’s a pro tip: set up a sturdy workbench and keep your vacuum handy. You wouldn’t believe how much debris foam cutting creates!
Cost-Effective Material Shopping
Smart shopping for your DIY mattress materials can save you hundreds without sacrificing quality.
I’ve found that starting with upholstery shops is your best bet – they often have high-density foam and latex at prices well below retail. Trust me, it’s worth making a few phone calls to compare prices.
For the cover materials, I recommend checking both online retailers and local fabric stores. You’ll want to look for organic cotton or bamboo fabric, which you can often find at competitive prices if you’re willing to browse a bit.
Don’t forget to keep an eye out for seasonal sales!
Here’s a money-saving tip that might surprise you: consider using second-hand materials where appropriate. A quality Combi-Zone coil system can serve as an excellent foundation for your DIY mattress build.
While I wouldn’t recommend used foam or batting, you can often salvage zippers, certain fabrics, and even natural latex scraps from other projects.
If you’re planning to use materials like hemp hulls or cotton batting, buying in bulk can dramatically reduce your costs.
I’ve seen DIY enthusiasts split bulk purchases with friends, bringing the price down to nearly half of retail.
Planning Your DIY Mattress
Before diving into your DIY mattress project, you’ll need a solid plan that considers materials, design, and construction methods. I’ve found that successful DIY mattresses start with careful research and a clear vision of what you want to achieve.
Let’s break down the key planning elements that’ll help you create your perfect mattress.
First, consider what makes you excited about building your own mattress:
- You’ll save money by choosing cost-effective materials that match your exact needs
- You’re in complete control of every layer’s firmness and feel
- You can replace individual layers over time instead of buying a whole new mattress
- You’ll know exactly what materials are in your mattress (perfect for allergy sufferers!)
- You’re creating something unique that’s perfectly tailored to your body
When planning your layers, I recommend starting with the support core – either high-density polyfoam, latex, or pocket coils.
Then, work your way up through the comfort layers, keeping in mind that firmer materials belong at the bottom.
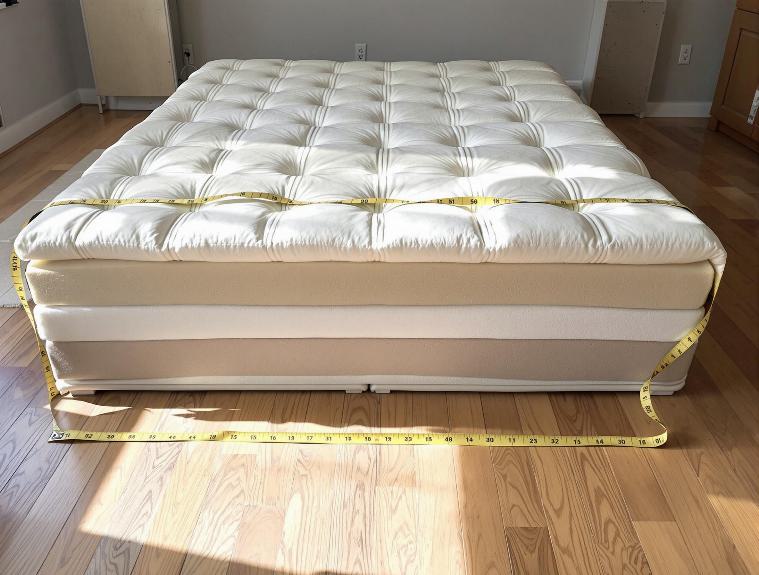
Remember to keep your total thickness under 14 inches to prevent heat buildup, and don’t forget to measure twice before ordering your materials.
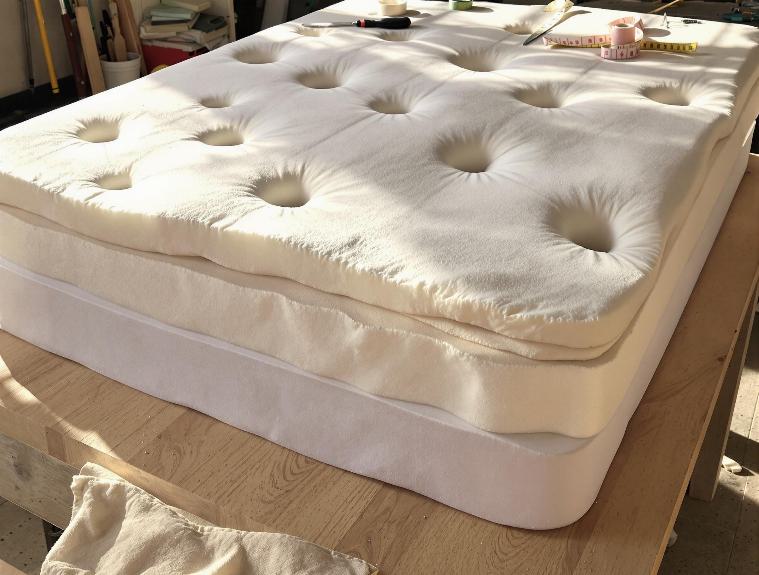
Assembly Steps and Techniques
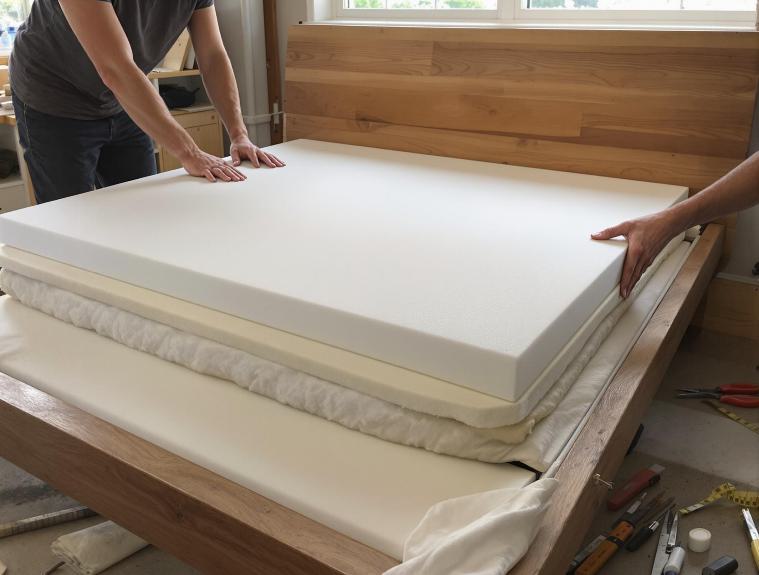
Building your DIY mattress requires careful attention to detail and a systematic approach to assembly. I’ll guide you through this process step by step, making sure you’ll create a mattress that’s both comfortable and durable.
Start by preparing your layers in the correct order. I always recommend placing the firmest layer at the bottom as your foundation, then working your way up to the softer comfort layers.
Think of it like building a cake – you need a solid base before adding the fluffy stuff! Make sure each layer aligns perfectly with the others.
Now, let’s connect these layers. I’ve found that quality adhesives or stitching work best to keep everything secure.
For the cover, I’ll suggest using a breathable, durable fabric that’s slightly larger than your mattress dimensions. Don’t forget to add a zipper or Velcro closure – trust me, you’ll thank me later when it’s time to clean it.
Finally, consider adding those finishing touches that make a big difference. A mattress topper can provide extra comfort, while proper edge support will prevent sagging.
Remember to keep the total height under 14 inches to avoid heat retention issues.
Customizing for Personal Comfort
Your mattress’s comfort level is deeply personal, and that’s why DIY construction offers such a tremendous advantage.
I’ll show you how to create the perfect combination of materials and layers that’ll have you sleeping like royalty. When selecting your foam layers, start with a firm high-density base for support, then add softer comfort layers on top – think of it like building the perfect sandwich!
Here’s what makes DIY mattress customization so exciting:
- You’re in complete control of your sleep experience
- You can adjust firmness levels until they’re just right
- You’ll save money by choosing materials that matter most to you
- You can swap layers if your comfort needs change
- You’re free to use eco-friendly materials throughout
Let’s focus on getting that firmness level perfect for you.
I recommend starting with a 6-inch base layer of high-density foam, then experimenting with different combinations of latex, memory foam, or poly foam for your comfort layers.
Don’t forget to test each layer as you build – it’s like taste-testing your masterpiece before serving it up for a full night’s sleep!
Care and Long-Term Maintenance
I’ll show you how to protect your DIY mattress investment with a simple but effective care routine that’ll make it last for years.
Your mattress needs regular cleaning and inspection every 3-4 months, which includes vacuuming, deodorizing with baking soda, and checking each layer for wear or shifting.
While it might seem like a lot of work, I’ve found that setting reminders on my phone helps me stay on top of maintenance tasks, and trust me, it’s worth it when you’re still sleeping comfortably years down the road.
Regular Cleaning Schedule
Maintaining a proper cleaning schedule for your mattress greatly extends its lifespan and guarantees a healthier sleep environment.
I’ve found that weekly vacuuming with an upholstery attachment makes a huge difference in keeping dust mites at bay. For the best results, I always use a vacuum with a HEPA filter – it’s like giving your mattress a spa treatment for allergens!
When it comes to stains (we’ve all been there!), I immediately tackle them with cold water and mild soap, gently blotting rather than rubbing.
Every three months, I’ll do a deep clean and rotation, while my favorite refresh trick involves baking soda and a few drops of lavender essential oil.
- Your mattress absorbs about half a pint of sweat each night – yikes!
- Dust mites love making your mattress their cozy home
- A clean mattress can add years to its life (and your health)
- That “new mattress smell” isn’t always a good thing
- Your mattress might be twice as heavy now as when you bought it (thanks, dust!)
Remember to flip two-sided mattresses every six months, and don’t forget about vacuuming underneath – you’d be surprised what lurks down there!
Extending Mattress Life
Three key practices form the foundation of extending your mattress’s lifespan: proper rotation, protective covering, and preventive maintenance. I’ll tell you exactly how to make these work for you.
Let’s start with rotation. I recommend rotating your mattress 180 degrees every three months. If you’ve got a double-sided mattress, don’t forget to flip it too! It’s like giving your mattress a vacation from those body-shaped dips we all create.
Protection is your mattress’s best friend. I always suggest using a high-quality, breathable mattress protector – think of it as a raincoat for your bed! Clean it regularly, and don’t wait to replace it if it’s showing wear. Trust me, it’s cheaper than buying a new mattress.
For ongoing care, I’ve found that regular vacuuming works wonders. Sprinkle some baking soda before vacuuming (it’s like a spa day for your mattress), and always tackle stains immediately with gentle cleaning solutions.
Remember: dab, don’t rub – we’re not trying to give the mattress a massage! Keep these practices consistent, and you’ll greatly extend your mattress’s life.
Layer Inspection Tips
Now that you’ve established good maintenance habits, regular layer inspection becomes your next line of defense.
I’ll show you how to spot potential issues before they become major problems, using simple tools you probably already have at home.
Think of yourself as a mattress detective – you’ll need a dark string, a CD, a ruler, and your smartphone to document everything.
Here’s what I want you to watch out for during your inspection:
- Those sneaky indentations that make you feel like you’re sleeping in a crater
- Suspicious lumps that weren’t there when you first got your mattress
- Mystery stains that somehow appeared (we won’t judge!)
- Edges that are starting to look more like a roller coaster than a straight line
- Foundation issues that could be sabotaging your sleep quality
Frequently Asked Questions
How Long Does a DIY Mattress Typically Last Compared to Store-Bought Ones?
I’ve found that a DIY mattress can last just as long as store-bought ones – typically 7-10 years – when you use high-quality materials and proper construction techniques.
If you’re using premium components like latex or high-density foam, you might even get 12-15 years out of it!
Just remember, proper maintenance is key, and factors like your weight and sleep position will affect its lifespan.
Can I Modify or Repair Specific Layers After the Mattress Is Assembled?
Yes, I can help you modify or repair specific layers even after assembly!
Most DIY mattresses allow you to unzip or peel back the cover to access individual layers.
You’ll want to use fabric adhesive for quick fixes, or carefully remove and replace damaged foam sections.
I’ve found that keeping the original measurements handy makes it easier to swap out layers.
Just remember to realign everything carefully when reassembling to avoid lumps.
What Certifications Should I Look for When Sourcing DIY Mattress Materials?
I’d recommend starting with GOTS certification for organic materials and GOLS if you’re using latex.
CertiPUR-US is essential if you’re incorporating foam layers – it guarantees you’re getting safer materials without harmful chemicals.
For extra peace of mind, look for GREENGUARD Gold or OEKO-TEX Standard 100 certifications.
These standards help you avoid toxic substances while building a healthier sleeping environment.
Is It Possible to Make a Split-Firmness Mattress for Couples?
Just like choosing sides of the bed, I’ve found that couples can absolutely create their own split-firmness mattress!
I recommend building it with separate comfort layers on each side while maintaining a shared support core.
You’ll want to use different density foams or latex layers for each side, similar to how you’d customize two sundaes – one with soft vanilla, one with firm chocolate.
It’s totally doable with the right materials.
Do DIY Mattresses Require Special Bed Frames or Foundations?
Most DIY mattresses work fine with standard bed frames, but I’d recommend checking your specific design needs.
If you’re using memory foam or latex layers, you’ll want a solid or closely-slatted foundation for proper support.
I always suggest platform beds or foundations with slats no more than 3 inches apart.
For heavier or thicker DIY mattresses, you might need extra center support to prevent sagging.
